Adding Sound
Introduction
The BigTreeTech CB1 processor board and Manta controller do not have built-in support for audio output. However, the CB1 Linux kernel has USB audio support compiled into it as a module. This mod takes advantage of that and uses a low-cost USB sound card to give your printer the ability to play audio files in WAV, FLAC, and MP3 formats.
This guide assumes some familiarity with ssh'ing into your printer, working on the Linux command line, and adding / editing files on the CB1 processor. These are skills you should have picked up when initially setting up your printer so this mod should be doable for most people.
Hardware
You'll need the following hardware for this mod:
- A USB external sound card adapter that can work in Linux natively without any special drivers. The UGreen USB Sound Card adapter works well, is inexpensive, and is widely available from sites like AliExpress (opens in a new tab) & Amazon (opens in a new tab). Other adapters might work but are untested.
- A small speaker or two suitable for mounting within your electronics bay or mounting to the printer. Most USB adapters are meant to drive a set headphones, so an amplified set of speakers doesn't hurt if you want lots of volume.
- A 3.5mm audio cable suitable for connecting up your speakers. If you are using speakers with bare terminals, the plug and its wire salvaged from an old pair of headphones works fine.
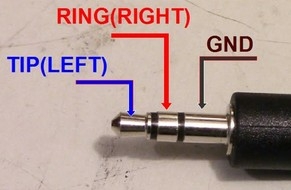
Wire up the 3.5mm audio cable up to your speakers. How you do this depends on the hardware you've pulled together. If you are wiring an old headphone cable to a set of speakers with bare terminals, use this picture as a guide to how the pins on the 3.5mm plug should be hooked up to your speakers
Next, plug the 3.5mm plug into the headphone jack of the USB sound card adapter. If you are using the UGreen adapter or something similar with a microphone jack, it will go unused. Finally, plug the USB adapter into one of the USB 2.0 ports on the Manta.
That's it! The hardware is done. Next up: install the necessary software.
Software
We need a way for Klipper to interface to the USB sound card adapter. We use the G-Code Shell Command Extension for Klipper (opens in a new tab) that lets you "execute Linux commands or even scripts from within Klipper with custom commands defined in your printer.cfg." If you are using KIAUH (the Klipper Installation And Update Helper) (opens in a new tab), then you are already good to go. If not, we'll install just a couple files to provide the minimum functionality we need.
- Download the file gcode_shell_command.py (opens in a new tab) from Github and save it to your PC.
- Transfer the file to your printer's
/home/biqu/klipper/klippy/extrasdirectory using FileZilla, WinSCP, or your file transfer program of choice. - Download the file shell_command.cfg (opens in a new tab) from Github and save it to your PC.
- Transfer the file to your printer's
/home/biqu/printer_data/configdirectory as above. Note that this is the same directory that holdes yourprinter.cfgfile. - Restart Klipper so it picks these new files up.
That is it for the software side of things. The last part is configuration and testing, and it is where things get a little trickier.
Configuration and Testing
Gather Some Information
With everything powered up and the USB audio adapter plugged into a USB 2.0 port on the Manta, use ssh to access the CB1 from your PC and execute the following command. We'll first verify that Linux sees the adapter.
biqu@Voron:~$ dmesg |grep C-MediaYour command and the resulting output should look something like this. Note that the "USB Audio Device" has been recognized.
biqu@Voron:~$ dmesg |grep C-Media
[18268.592541] usb 2-1.2: Manufacturer: C-Media Electronics Inc.
[18268.616775] input: C-Media Electronics Inc. USB Audio Device as /devices/platform/soc/5200000.usb/usb2/2-1/2-1.2/2-1.2:1.3/0003:0D8C:0014.0002/input/input2
[18268.675128] hid-generic 0003:0D8C:0014.0002: input,hidraw0: USB HID v1.00 Device [C-Media Electronics Inc. USB Audio Device] on usb-5200000.usb-1.2/input3
If it doesn't show up, make sure all your USB connections are good. Some adapters like the UGreen have a small LED that lights up when power is applied.
Linux audio on the CB1 is handled by something called Alsa. We will use Alsa's aplay command to verify that it also recognized the USB audio adapter. The aplay command should already be installed on your CB1, as are the rest of the utilities we'll be using going forward.
Execute the following command:
biqu@Voron:~$ aplay -lYou should see something like this when the command is run. Note that the USB Audio Device is recognized as card 2, at least in this example. Note the card number for your setup - we'll need it soon.
biqu@Voron:~$ aplay -l
**** List of PLAYBACK Hardware Devices ****
card 0: sndahub [sndahub], device 0: Media Stream sunxi-ahub-aif1-0 [Media Stream sunxi-ahub-aif1-0]
  Subdevices: 1/1
  Subdevice #0: subdevice #0
card 0: sndahub [sndahub], device 1: System Stream sunxi-ahub-aif2-1 [System Stream sunxi-ahub-aif2-1]
  Subdevices: 1/1
  Subdevice #0: subdevice #0
card 0: sndahub [sndahub], device 2: Accompany Stream sunxi-ahub-aif2-2 [Accompany Stream sunxi-ahub-aif2-2]
  Subdevices: 1/1
  Subdevice #0: subdevice #0
card 1: Codec [H616 Audio Codec], device 0: CDC PCM Codec-0 [CDC PCM Codec-0]
  Subdevices: 1/1
  Subdevice #0: subdevice #0
card 2: Device [USB Audio Device], device 0: USB Audio [USB Audio]
  Subdevices: 1/1
  Subdevice #0: subdevice #0
Now we'll run the aplay command again but with a capital "L" instead of a lower case "l". This gives us a lot more detailed information.
Execute the following command:
biqu@Voron:~$ aplay -LA bunch of stuff will scroll by. Only an excerpt showing the important stuff is shown below.
null
    Discard all samples (playback) or generate zero samples (capture)
default
hw:CARD=sndahub,DEV=0
    sndahub, Media Stream sunxi-ahub-aif1-0
    Direct hardware device without any conversions
...
plughw:CARD=Device,DEV=0
    USB Audio Device, USB Audio
    Hardware device with all software conversions
sysdefault:CARD=Device
    USB Audio Device, USB Audio
    Default Audio Device
front:CARD=Device,DEV=0
    USB Audio Device, USB Audio
    Front output / input
surround21:CARD=Device,DEV=0
    USB Audio Device, USB Audio
    2.1 Surround output to Front and Subwoofer speakers
...
The important part here is the line starting with front showing up for USB Audio Device. This represents the two channel audio output from the USB audio adapter. There are a bunch of other formats supported by the internal audio chip that we can safely ignore. What you are particularly interested in is the text on that line prior to the comma. So for this example of front:CARD=Device,DEV=0, copy the text front:CARD=Device.
Initial Audio Test
Now we'll see if we can get some audio out of this setup with the speaker-test command. Execute the following command with the text you just copied following the -D with no space in between.
biqu@Voron:~$ speaker-test -Dfront:CARD=Device -c 2 -s 1 -t sine -f 440If everything went right so far, you will hear a 440 Hz sinewave tone (-t sine -f 440) on Device front:CARD=DEVICE channel #1 (-s 1) meaning the Left channel. -s 2 would test the right channel. You should also see something in the terminal that looks like this.
biqu@Voron:~$ speaker-test -Dfront:CARD=Device -c 2 -s 1 -t sine -f 440

speaker-test 1.2.4

Playback device is front:CARD=Device
Stream parameters are 48000Hz, S16_LE, 2 channels
Sine wave rate is 440.0000Hz
Rate set to 48000Hz (requested 48000Hz)
Buffer size range from 96 to 262144
Period size range from 48 to 131072
Using max buffer size 262144
Periods = 4
was set period_size = 65536
was set buffer_size = 262144
  - Front Left
If you heard a sound, congratulations! If not, go back and very carefully check your work. Unfortunately there is a lot of complexity in all of this so giving a few specific troubleshooting tips is difficult especially if you pick something different than the recommended UGreen adapter. Google and Discord are your friends.
Alsamixer Setup
The speaker-test program is very low level. The next step is to get the higher level Alsa stuff working. Time to fire up alsamixer as shown here.
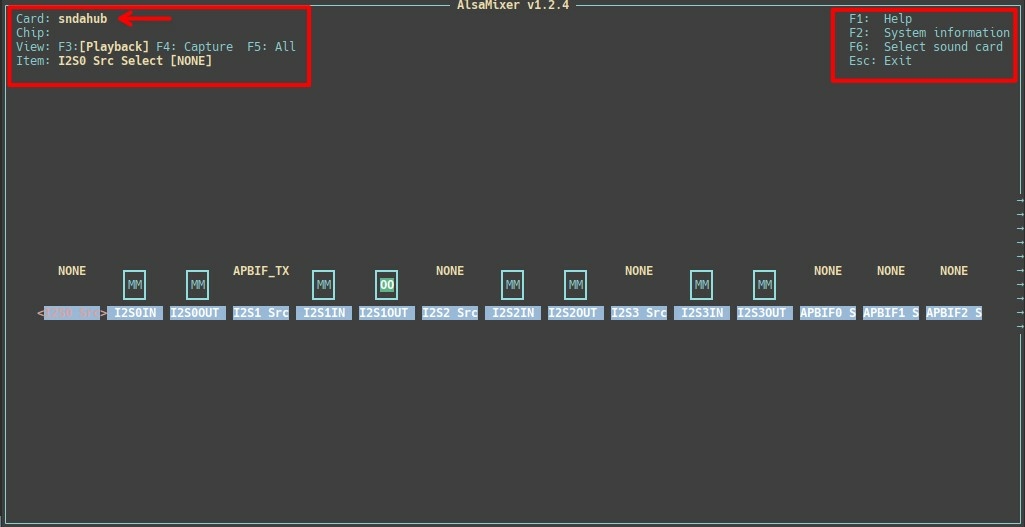
biqu@Voron:~$ alsamixerAlsamixer can display all the sound-related devices it knows about, and will most likely default to something relatively complicated called sndahub listed in the top left hand corner of its window as shown below. The first thing you want to do is review some of the basic Alsamixer commands shown in the top right of its window. Hit F1 to display the Help window to familiarize yourself with the available commands and then Esc when you are done.
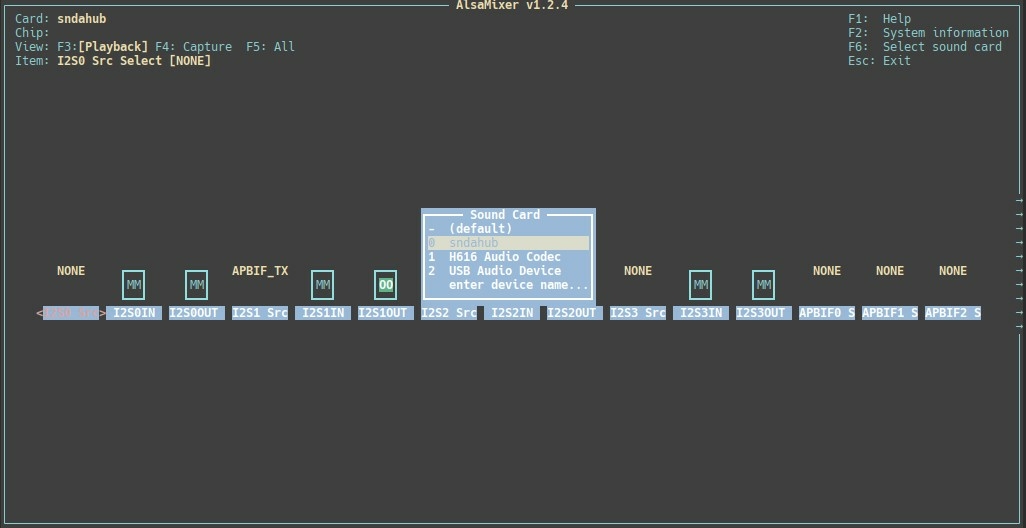
Next you want to hit F6 to select the appropriate sound card. You should see a display like that shown below. Use the arrow keys to highlight USB Audio Device (shown here as Sound Card 2) and Enter to select it. Note that Sound Card 2 here is a match with the card number from aplay -l that we ran a while back.
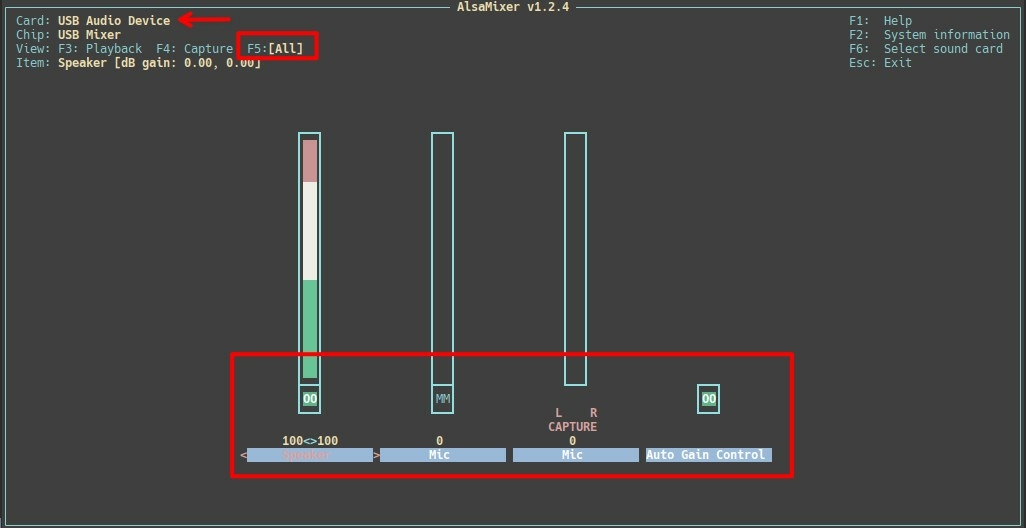
Select F5 to view all of the available configuration parameters for the USB Audio Device. Use the Left & Right arrow keys to move around between Speaker, Mic, etc and the Up & Down arrow keys to set the levels for each. The m key will mute a given element. Mess around until you end up with the settings shown below.
- Speaker is set to 100% (at least to start with) and not muted.
00will show at the bottom of its vertical bar when the speak is not muted. - The two microphones are set to 0% and are muted (
MM) if that setting is available - Auto gain control should show as
00. This presumably means "enabled" and in fact cannot be changed on my adapter.
The end result should appear as shown below.
Once you're done, hit Esc to exit alsamixer.
This next step is critical!
The alsamixer settings have been set but they need to be stored so they will survive a reboot. Do that by executing the command
biqu@Voron:~$ sudo alsactl storeThere is no feedback from this command if it ran successfully. If you see a message like
alsactl: state_lock:125: file /var/lib/alsa/asound.state lock error: File existsthat probably means you didn't run it with sudo.
Creating asound.config
This step is even more critical than the last one!
The last part of the Linux sound setup is telling Alsa which sound card to use by default. This is specified in a file called /etc/asound.conf. It is not easy to understand so don't worry if you don't follow what it is doing. We're going to make it as simple as possible and move on.
Use sudo plus your editor of choice (vim in this case) to create the Alsa configuration file asound.conf.
biqu@Voron:~$ sudo vim /etc/asound.confThe contents of the file should be this. Note that card 2 is used here because the USB adapter has shown up as card 2 in all our previous steps. If the card shows as a different number for you (it probably shouldn't), use that instead. The rest of the file is basically magic.
pcm.!default {
        type hw
        card 2
}

ctl.!default {
        type hw
        card 2
}
If you aren't familiar with any text editor on Linux, you could create a file called asound.conf on your PC and then transfer it to the /home/biqu directory on your printer with Filezilla / WinSCP. Then you could move that file to the right place with
biqu@Voron:~$ sudo mv asound.conf /etcWith all of that configuration done, reboot your printer from the Mainsail interface to make sure all the changes we've made have been picked up.
Grab Some Sound Files and Test Them Out
Unlike Windows, Linux is case sensitive. Redalert.wav is a different file from redalert.wav. It will also greatly simplify your life if you don't use spaces in your filenames. Keep it simple.
This part is easy. We're going to create a directory to store the sound files that you can play either from the command line or via Klipper. Execute these two commands after ssh'ing back into the printer after the reboot in the previous step.
biqu@Voron:~$ mkdir sounds
biqu@Voron:~$ cd sounds
You now have a sounds directory and have changed into that. Now go and download a few WAV or MP3 files from somewhere onto your PC and transfer them to that sounds directory. A few suggested guidelines.
- It is probably best to keep them short: think seconds long and not minutes long
- WAV files probably put a little less processing demand on the CB1 than MP3 files, though both seem to work OK
- Remember that Linux is case sensitive and spaces in file names are a pain. Keep everything lower case without spaces to minimize the chance of an error.
We are finally at a point where we can test this setup with a real audio file. Assuming a file named redalert.wav, enter this command, substituting with the name of your particular file (note that the Linux command line supports tab completion for file names)
biqu@Voron:~/sounds$ play redalert.wav -t alsaIf everything has been done correctly, you should hear your sound sample and see something similar to this in the terminal. You might get a warning like that shown below but usually the sound will play just fine anyway.
play WARN alsa: can't encode 8-bit Unsigned Integer PCM

redalert.wav:

 File Size: 13.4k     Bit Rate: 120k
  Encoding: Unsigned PCM
  Channels: 1 @ 8-bit
Samplerate: 11025Hz
Replaygain: off
  Duration: 00:00:00.90

In:100%  00:00:00.90 [00:00:00.00] Out:39.7k [  -===|===-  ] Hd:0.6 Clip:0
Done.
If you heard a sound, congratulations once again! If not, go back and double-check your work. See if there are any error messages that give you a clue as to what isn't working. Try firing up alsamixer again and see that it comes up with the settings you created earlier. Again, Google and Discord are your friends.
Setting Up printer.cfg
We're now going to work from the Mainsail interface instead of an ssh shell into the CB1. Open your printer.cfg file from Mainsail and add the following line at the top of the file with the other include's that you'll have there already
[include shell_command.cfg]Now paste the following code in around where you have the rest of your macros. You might notice that the PLAY_SOUND macro assumes the sounds folder in /home/biqu that we set up earlier.
verbose is set to True in the code below to aid with troubleshooting. You can set it to False once everything is working right.
# SOUND!
[gcode_shell_command PLAYCMD]
command: play -q
timeout: 5.
verbose: True

[gcode_macro PLAY_SOUND]
gcode:
  {% set cmdline = params.SOUNDFILE|default("redalert.wav")|string %}
  {% set cmdline = "/home/biqu/sounds/" + cmdline  + " -t alsa" %}
  { action_respond_info('Commandline: %s' % (cmdline)) }
  RUN_SHELL_COMMAND CMD=PLAYCMD PARAMS="{cmdline}"
While we are at it, let's set up a bit of delayed GCode so that an audio file is played one second after Klipper starts up.
# Things to do when Klipper first starts up
[delayed_gcode PRINTER_STARTUP]
initial_duration: 1
gcode:
    PLAY_SOUND SOUNDFILE="redalert.wav"
The line above shows all you need to know to sprinkle sound clips throughout your printer.cfg file.
PLAY_SOUNDis the name of the macroSOUNDFILE=is passed the name of the audio sample you want to play. It's name is quoted and it must exist in/home/biqu/sounds. Again, remember that Linux is case sensitive.
Final Testing
After making the changes to printer.cfg in the previous section, select "SAVE & RESTART" from Mainsail's editor interface. If all went well...
- the sample you provided in the
delayed_gcodemacro will play - you will have a
PLAY SOUNDmacro listed with your other macros. Running the macro will play the default audio file specified within the code of that macro OR you can click the Down Arrow button next to the macro name to play the file of your choice from thesoundsdirectory in/home/biqu. - you can type something like
PLAY_SOUND SOUND="redalert.wav"in the "Console" section of the Mainsail Dashboard to play the sound file of your choice
Now all that remains is to gather up more clips and sprinkle them throughout your printer.cfg file. Be creative and have fun!
References & Further Reading
- Reddit thread on playing sounds with Klipperscreen (opens in a new tab). This also hints how you could get Klipper to speak arbitrary text rather than audio files you supply.
- The Arch Linux Wiki entry for Alsa (opens in a new tab)
- Alsa configuration file documentation (opens in a new tab)