General Assembly Tips
The packing is designed by the assembly sequence. We strongly recommend not taking parts and pieces out of each layer. You can take every layer out but keep them as layers with parts intact.
Electronics
LRS-200-24 Power Supply
To make the wiring cleaner, the power supply is mounted differently from the official manual. Check our Print Guide for your particular printer for the files you need to print these mounts. They should look like this picture. Use 4x M4x6 BHCS to mount it.
Nevermore Filter
The Nevermore filter included with the kit is the Nevermore V5 Duo. Please review these links before assembly.
- BOM (opens in a new tab) on Github
- Assembly Instructions (opens in a new tab) also on Github.
- Plenum Assembly Album (opens in a new tab)
The plenum assembly album is very informative but it does not show some of the other things you need to do, like the installation of the heatset inserts. Note also that these instructions will require a soldering iron for connecting the two fans to its 2 pin JST power connector (the kit does not include a breakout board for this purpose).
PEI / Buildplate / Heater
The bed heater is pre-installed on the build plate but you need to install the magnetic sheet yourself. The PEI and magnetic plate included in our kits are slightly larger than the buildplate size on purpose, so that you don't have to align them precisely when placing the spring steel. After sticking them on, you can use a blade to trim off the excess part.
This Nero3D video on YouTube (opens in a new tab) shows how the magnetic plate can be applied. However, it is even easier if you take this advice in one of the comments:
ProTip™ for aligning the magnet: peel off a strip of the backing, but lay down the other end first while keeping the exposed adhesive strip a bit elevated (the backing usually takes care of that, unless you peeled of too much). Then you have not only 1 edge to properly align it, but 3. Then just brush from e.g. the aligned back/sides towards the exposed front strip, pressing it down perfectly aligned. And then you can continue like shown in the video.
You will need to cut holes in the magnetic sheet either before or after its application so you can fasten it to the bed frame later.
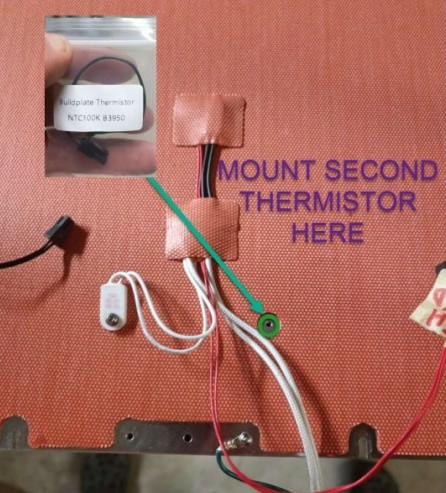
The MPX build plate includes a second thermistor for monitoring its temperature within Mainsail, and the MPX default printer.cfg files are preconfigured to read it. The thermistor attaches at the location shown below towards the back of the build plate. You can use a small amount of heatsink grease or thermal paste on its threads to improve its response time, but do note that its reading will still lag that of the standard heater thermistor by 5-10°C during warmup. Be careful not to over-tighten the thermistor or you will strip its threads.
The two thermistors are cabled as follows:
- the MPX cable labeled HE (HEater) connects to the pre-installed thermistor
- the MPX cable labeled BP (Build Plate) connects to the second thermistor you install yourself
Stealthburner
Main Body
For the CW2 thumb screw washer, you need to use a 3x7x0.5 washer instead of the black washer supplied in the kit with all of the extruder components. The black washer is too large for the hole in the guilder arm and won't allow the thumbscrew to put proper tension on the filament.
The Stealthburner Manual does not document how to set the Anti-Squish Thingymajig. Some people also have trouble setting the gear meshing on the extruder's pancake motor. Watch these two video's from Dr. Dave on how to set these things up.
- How to set the gear mesh in a Voron Clockwork 2 Extruder (opens in a new tab)
- Voron Clockwork 2 Guidler Anti-Squish Thingymajig Adjustment (opens in a new tab)
Tap
Be aware of the following when building Tap:
- At time of writing, the official Voron Assembly manual for Tap was last released in 2022 and does not document the significant changes to its design since then. Note also that the official Voron manual for the Stealthburner shows the X-carriage for the standard Stealthburner design and not for Tap at this time (March 2024).
- To get around this, you will want to follow the latest errata documentation on Github to build Tap, currently for the R8 version (opens in a new tab) as of March 2024.
- Some glues like Cyanoacrylate (CA glue / Krazy Glue) and some epoxies do not hold at high temperatures. A high temperature epoxy like J-B Weld Original is recommended for the powerful magnets in the Tap assembly.
- The Tap rail needs to be cleaned and greased like all the other rails.
Special Consideration for Rapido Hotends
The MPX Kit is available with your choice of several hotends. The Rapido option currently offered is the V2. Here's some things you need to know if you choose the Rapido.
- The installation of the Rapido V2 in the Stealthburner is documented here on Github (opens in a new tab).
- The Rapido V2 includes its own built-in heater and thermistor. You will not need to use the NTC 100K thermistor or the 24V 50W heater that MPX supplies with the kits regardless of the hotend you order. That all sounds great but...
- The connector on the Rapido V2 thermistor doesn't fit on the SB2209. You either need to splice a cable on with a proper connector or you need to crimp a new connector on to the Rapido thermistor wire. Crimping a new connector is very challenging as it is so small (JST-GH 1.25). Most people will splice a pigtail wire with a proper connector on for that reason. Note that you can sacrifice the MPX-supplied thermistor for this purpose.