Universal Firmware
Klipper depends on a configuration file called printer.cfg that drives much of its operation. However, the default file provided by BTT is not useful and will in fact cause Klipper to report an error instead. Our printer.cfg files have all of the configuration information needed for our standard kits as long as you follow our wiring guide.
You will need to download two files. They can be found in the respective Github repository for your particular printer.
- For V2.4 printers, go to https://github.com/MagicPhoenix/MPX-VORON-24R2-CBT/tree/main/Firmware (opens in a new tab)
- For Trident printers, go to https://github.com/MagicPhoenix/MPX-VORON-TRIDENT-CBT/tree/main/Firmware (opens in a new tab)
The first file to download will become your new printer.cfg file. To get it:
- Go to the appropriate link above for your printer (V2.4 or Trident)
- Download the configuration file that matches your printer size (300mm vs 350mm) and the version of Manta M8P that you have (V1 vs V2). e.g.
300_printer_m8p_v2.cfg - Get that file onto your printer. Either
- rename that file to
printer.cfgand upload it to the CB1 via the Mainsail interface, overwriting the oldprinter.cfgor, - open the file on your PC with your editor of choice to copy and paste the file contents into the existing
printer.cfg. No trace of the originalprinter.cfgfile should remain.
- rename that file to
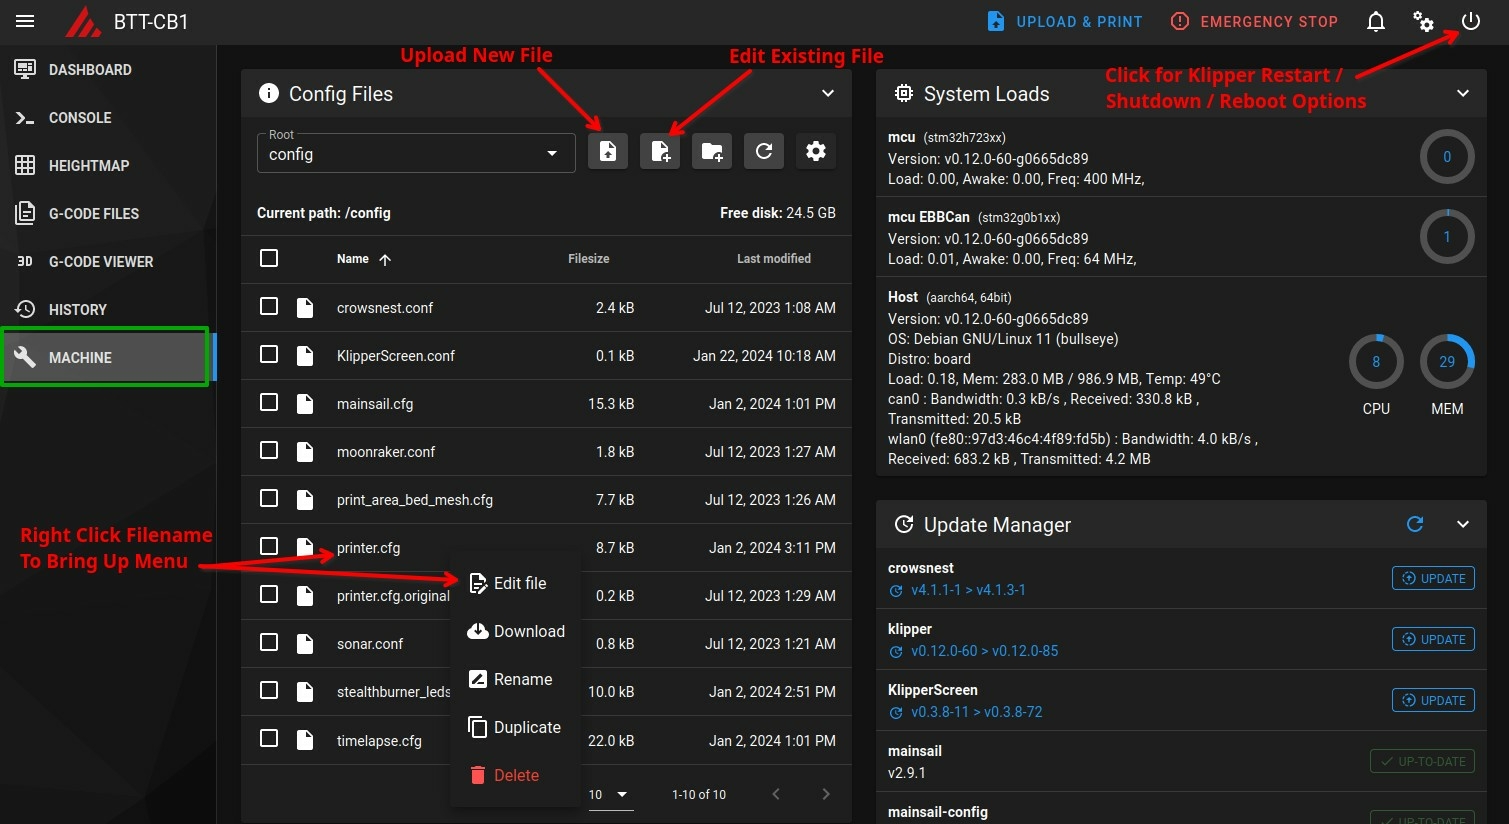
You can use the Mainsail web interface to easily make these changes. This annotated screenshot points out the key parts of the interface you'll need to know about to do so.
The second file to download is required for the LEDs on the Stealthburner. Download stealthburner_leds.cfg from the same place you got the first file and upload it to the printer via the Mainsail interface. Do not change the filename this time around.
If you ordered the Disco LEDs or Rapido hotend, you also need to follow Configuration for Specific Hardware to make further edits to your new printer.cfg file. Note that the Chaoticlab CNC tap does not require any special software configuration.
Slicer Settings
print_start/print_end macros
The print_start/print_end macros run some actions that are required before and after the actual printing. With the basic macros included in the printer.cfg, it will do the following:
- print_start
- Home all axis
- Level the bed (QUAD_GANTRY_LEVEL for v2.4 or Z_TILT_ADJUST for Trident)
- Rehome the axis
- Park over the center of the bed
- print_end
- Turns off the heaters
- Parks the toolhead at the back
- Turns off fans
In order to trigger these macros, we need to tell our slicer to pass the commands along in the gcode. See the sections below for the location to add our custom gcode for different slicers.
OrcaSlicer
The custom gcode settings are under Printer setting > Machine G-code (You will need to enable advanced settings to see it)
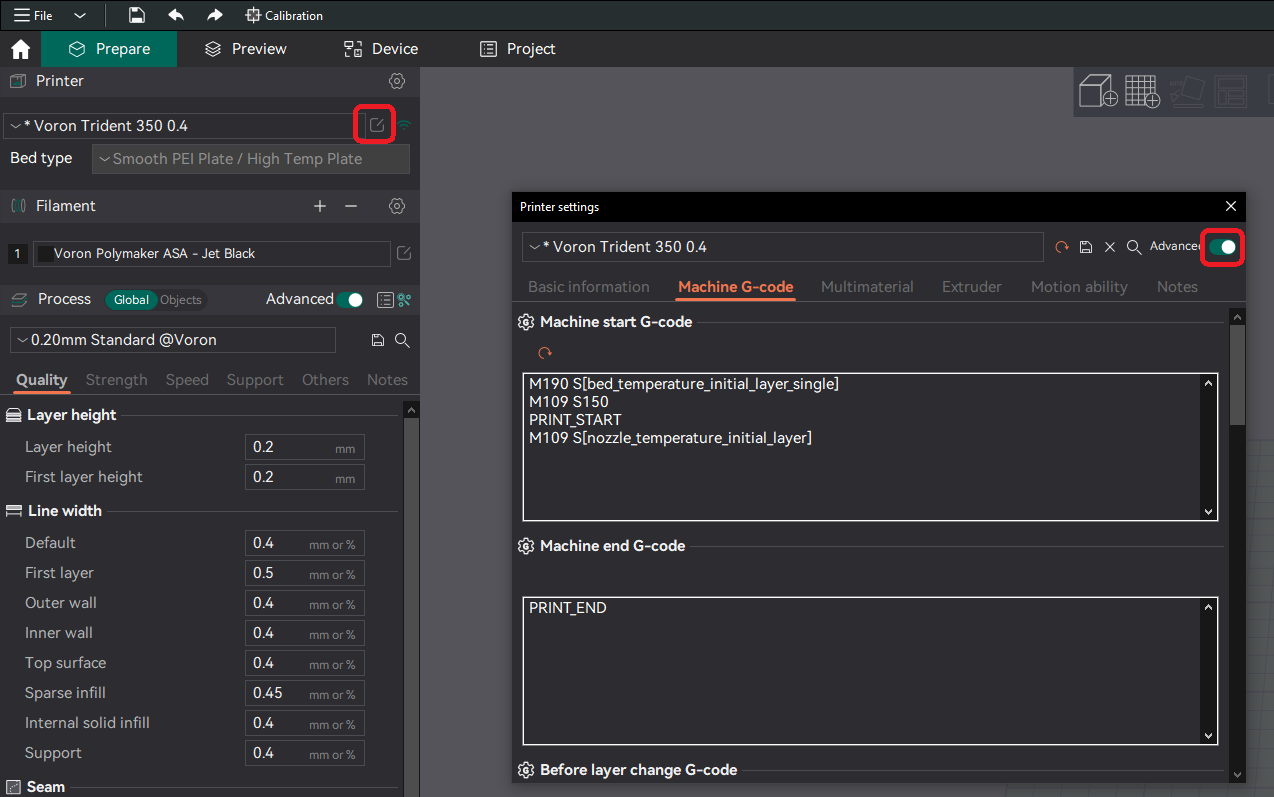
Machine start G-code
M190 S[bed_temperature_initial_layer_single]
M109 S150
PRINT_START
M109 S[nozzle_temperature_initial_layer]
Machine end G-code
PRINT_ENDPrusaSlicer
The custom gcode settings are under Printer Setting > Custom G-code (You will need to enable Expert settings to see it)
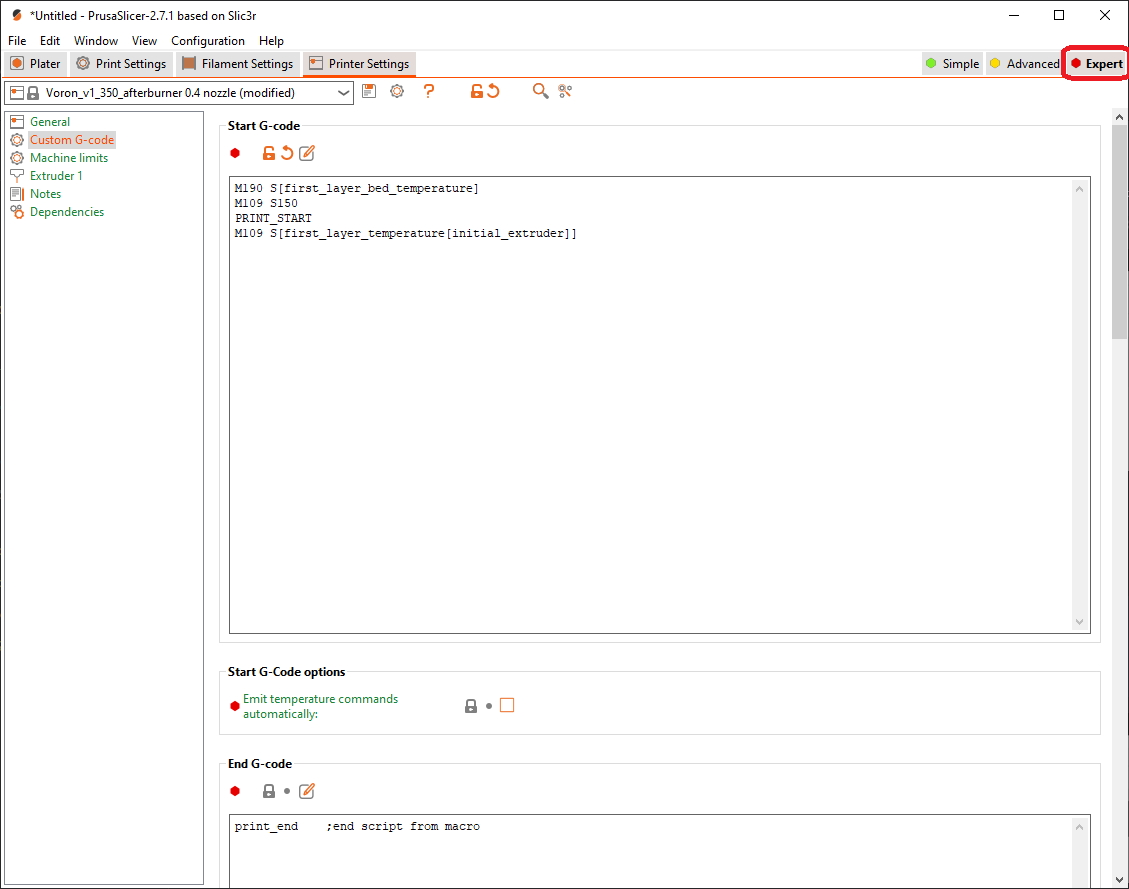
Start G-code
M190 S[first_layer_bed_temperature]
M109 S150
PRINT_START
M109 S[first_layer_temperature[initial_extruder]]
End G-code
PRINT_ENDSuperSlicer
The custom gcode settings are under Printer Setting > Custom G-code (You will need to enable Expert settings to see it)
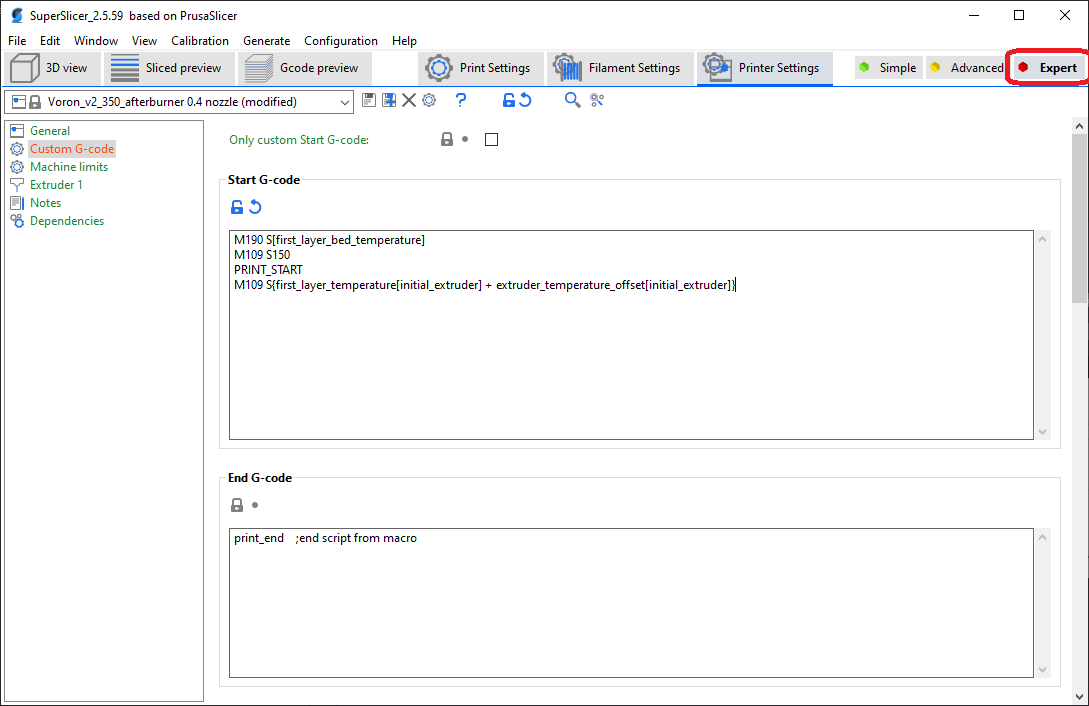
Start G-code
M190 S[first_layer_bed_temperature]
M109 S150
PRINT_START
M109 S{first_layer_temperature[initial_extruder] + extruder_temperature_offset[initial_extruder]}
End G-code
PRINT_ENDOnce you've got the basics down, you may want to look at this "Better Print Start Macro" (opens in a new tab) by jontek2 on Github.
Configuration for Specific Hardware
Disco LED
The Disco LED configuration is different depending on if you have a Manta V1 or V2. The former has two pins that separately drive each stick, the latter has a single pin that drives both sticks connected in series.
Uncomment the lines (remove the # character) in the "Disco LED" section in the printer.cfg file. For Manta V1 and its two drive pins, it should look something like this. Update the chain_count values in each section to equal the number of LEDs in each stick if necessary.
Most people will need to change the color_order value. The BGRW setting below indicates a LED that supports a fourth, pure white channel that the Disco sticks generally don't have. If your LEDs aren't working right or colors are wrong, try a color_order of RGB or GRB.
[neopixel disco1]
pin: PD15
chain_count: 25
color_order: BGRW
initial_RED: 1.0
initial_GREEN: 1.0
initial_BLUE: 1.0

[neopixel disco2]
pin: PB15
chain_count: 25
color_order: BGRW
initial_RED: 1.0
initial_GREEN: 1.0
initial_BLUE: 1.0
For Manta V2 and its single drive pin, it should look something like this, with the last half commented out. Update the chain_count value in the top half to equal the total number of LEDs in both sticks if necessary. The values in the bottom half are commented out so don't matter.
[neopixel disco1]
pin: PD15
chain_count: 50
color_order: BGRW
initial_RED: 1.0
initial_GREEN: 1.0
initial_BLUE: 1.0

# [neopixel disco2]
# pin: PB15
# chain_count: 25
# color_order: BGRW
# initial_RED: 1.0
# initial_GREEN: 1.0
# initial_BLUE: 1.0
Klipper NeoPixel
The Disco LED has some cool uses, such as using it as a progress bar for printing, indicating extruder temperature or printing speed. You can check it out at the Klipper Neopixel Github (opens in a new tab).
Our two Disco LEDs can be configured independently, so you can choose to use them for the same purpose or for different purposes. For example, you can use the left one to display extruder temperature and the right one to show print progress.
Rapido Thermistor
The Rapido has its own integrated thermistor. Specify ATC Semitec 104NT-4-R025H42G instead of the stock generic 3950 in your printer.cfg file. In other words, change this
heater_pin: EBBCan: PB13
sensor_type: Generic 3950
sensor_pin: EBBCan: PA3
to this
heater_pin: EBBCan: PB13
sensor_type: ATC Semitec 104NT-4-R025H42G
sensor_pin: EBBCan: PA3
in printer.cfg.