CBT Kit Manta M8P V2 + CB1 Start Guide
Introduction
MPX kits started shipping the V2 version of the Manta M8P in late 2023. If you have the older V1 version of the Manta, please refer to the Flash M8P V1 and EBB SB2209 page.
There are three microprocessors involved in running the printer: the one on the CB1, the one on the Manta M8P, and the one on the EBB SB2209 toolboard. Knowing how they all work together is important. The CB1 runs the show, the Manta gets delegated low level tasks like driving motors and fans from the CB1, and the EBB runs the Stealthburner in cooperation with the Manta.
Both the Manta and the EBB run Klipper. However, you will be compiling a different version of Klipper for each board because their processors are different (though the same source code is used for each). There is also something called CanBoot that you will be compiling for the EBB as well. Canboot is what allows future updates of Klipper on the EBB to be done via Canbus instead of USB i.e. over the existing wiring of your completed printer.
The process to get this all working is as follows:
- First you will get the CB1 processor board up and running by creating a TF card with a Linux image created by BigTreeTech (Flash CB1).
- Next you will get Klipper running on the processor running on the Manta. That is the big chip in the middle of the board. (Flash M8P).
- Next step is putting Canboot on the toolhead board with a connection between them that is initially USB so it can talk Canbus later. You do this because the toolboard isn't be able to talk Canbus out of the box (Flash Canboot to EBB by USB).
- The last big step is putting Klipper on the toolhead board because both ends need that for this whole thing to work (Flash Klipper to EBB by USB).
- After this, there are some final checks that everything is working (Flash Checks). There is a (Troubleshooting) section at the end as well in case of problems.
If you have never done anything like this before, relax. Short of letting the magic smoke out, any mistakes in flashing are easily fixed by reflashing the bootloader and starting over. If you are unsure about anything, ask in the MPX discord, we will help you.
Preparation
You need to provide a USB Type-C cable to plug into the Manta that can provide 5V output. We recommend USB-Type A to Type C cables.
Some Power Delivery chargers may output over 5V via USB-C to USB-C type cables that could burn out your M8P.
We also strongly recommend you use a USB Wall Charger: some PC USB ports don't have enough power to run the Manta plus the EBB, causing random issues.
Wiring
We strongly recommend flashing the M8P and the EBB before installing them into the printer. Wire them as shown.
This pic is M8P V1. For V2 the only difference is the Canbus port position has changed.
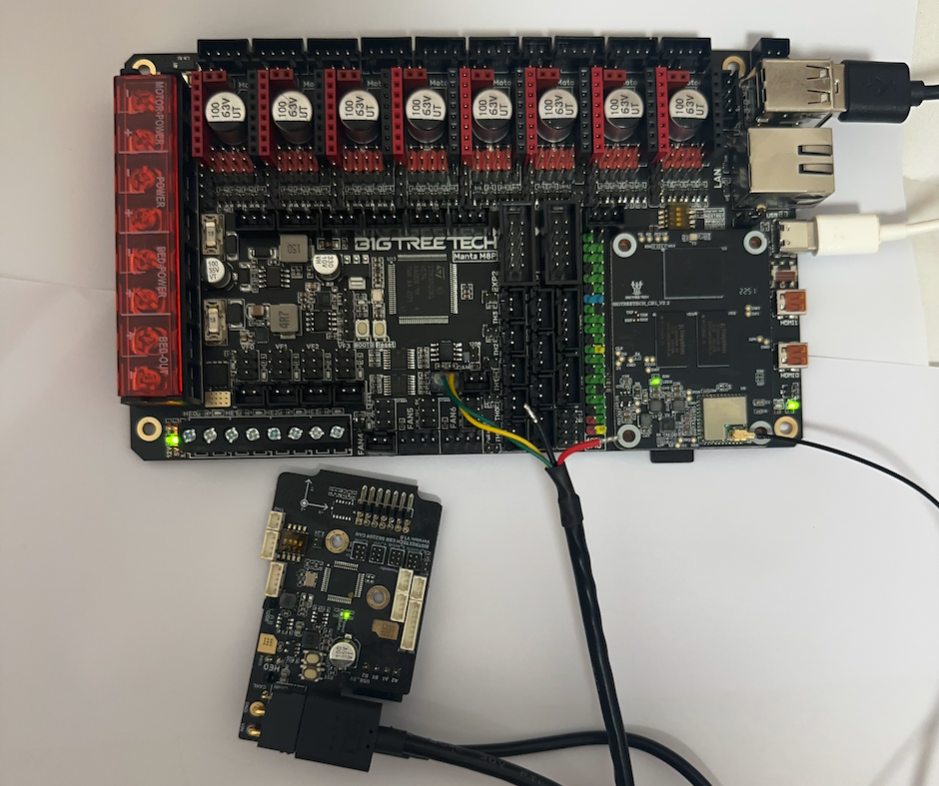
Do not connect the red and black wires on the Canbus cable or this will short out 5V to ground and let the magic smoke out. Do not leave them dangling as shown in the picture above. It is better to insulate the end of the red and black wires by tape or some other means to prevent accidental contact between the two wires, or between the wires and the Manta.
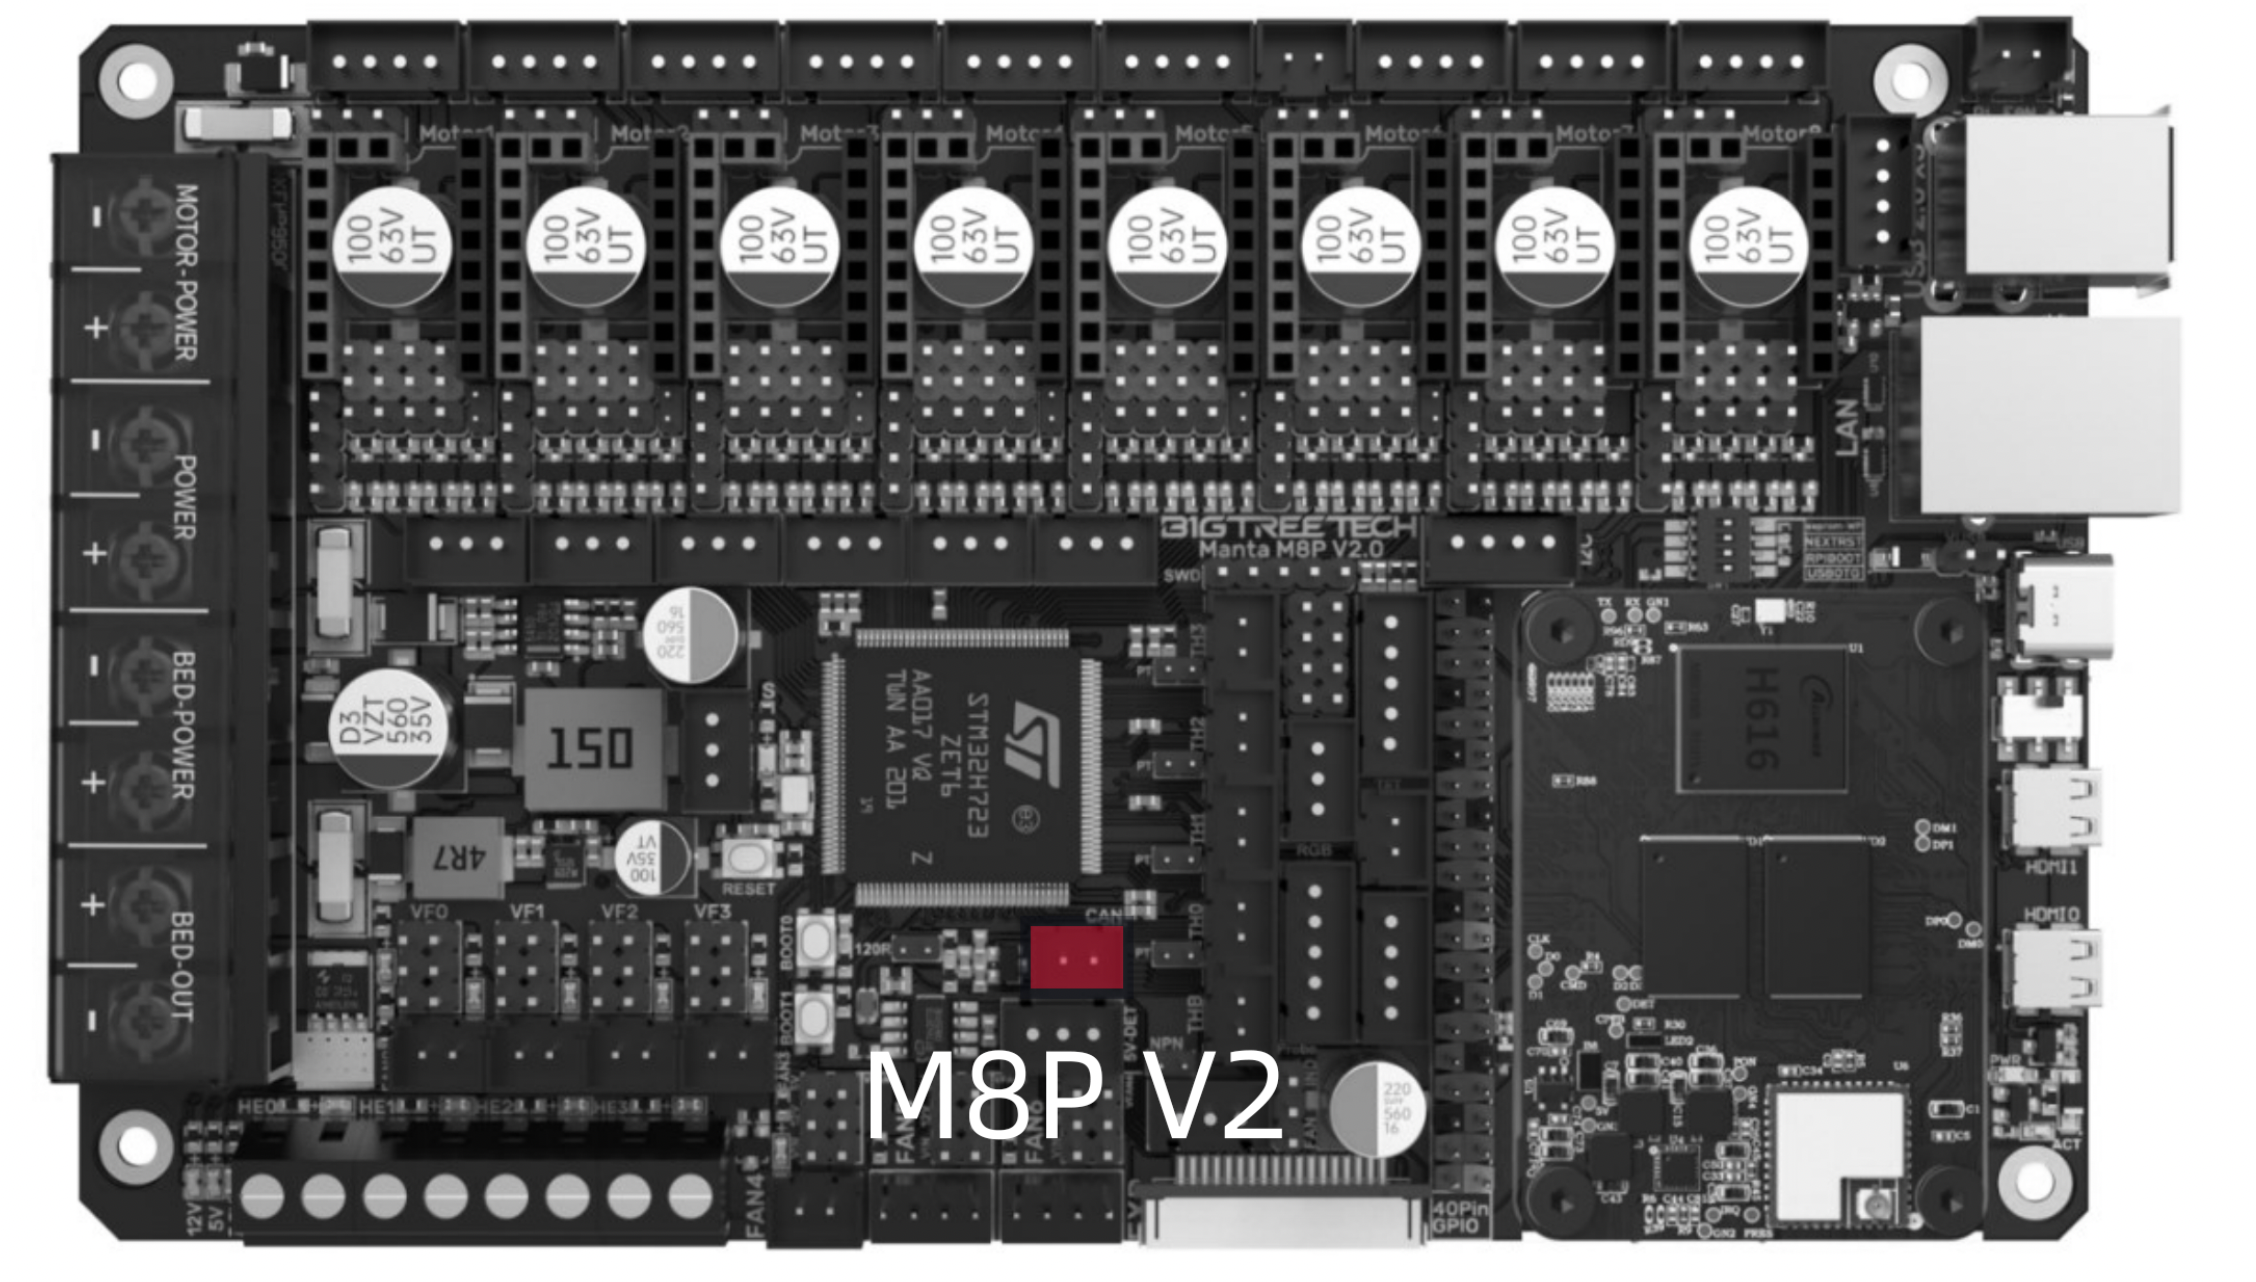
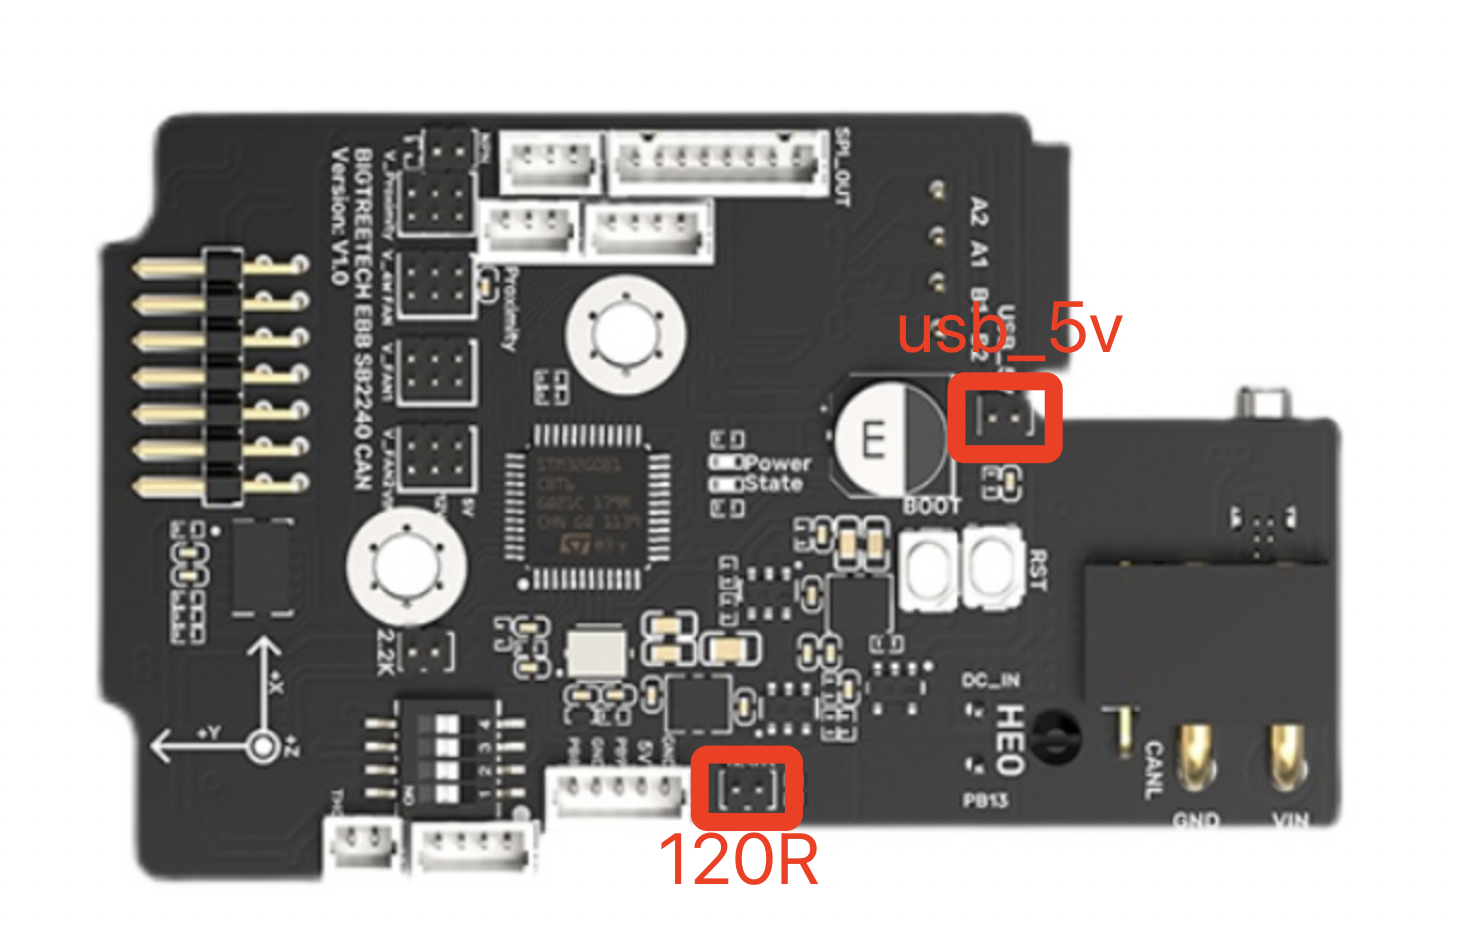
Connect the following jumpers and leave them connected until the checks at the end of this process are completed. Note that there are two different sizes of jumpers, so make sure you use the right size for each connection.
- V_USB and 120R on M8P
- USB_5V and 120R on EBB SB
This pic is made by @Westy_Pity_Da_Fool. It may be helpful in understanding the wiring. Note that while it isn't shown clearly here, you also need to plug a USB cable between the Manta and the EBB SB2209 as well.
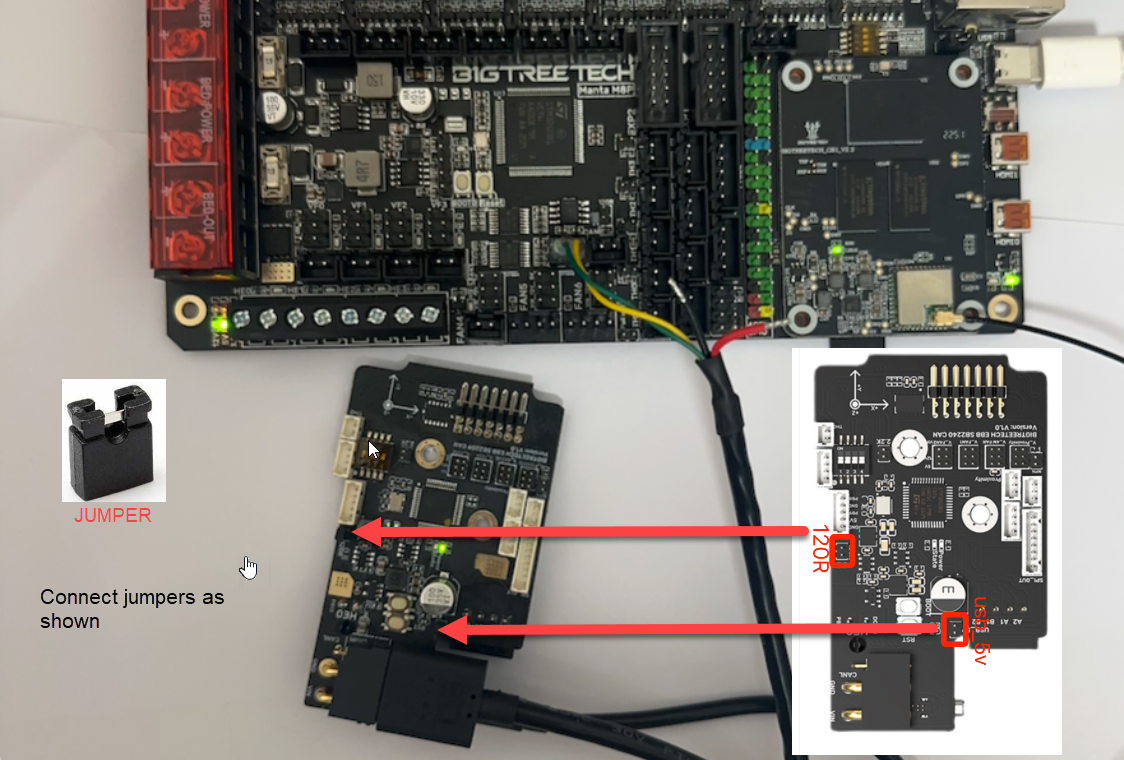
Wiring:
- USB cable from computer or wall supply to the M8P USB-C port.
- USB Type-A to Type-C Data cable from one of the M8P USB-A ports to the EBB SB USB-C port. It is best to use the one that came packaged with the Manta as this is known to work well.
- Canbus cable from EBB SB to M8P (Canbus two pin connector only. The red and black power wires should be taped off for safety.)
Flash CB1
Download the latest image name starting with CB1_Debian11_Klipper from the BTT Github (opens in a new tab)
Then use balenaEtcher to flash it into your TF card. You don't need to unzip the image.
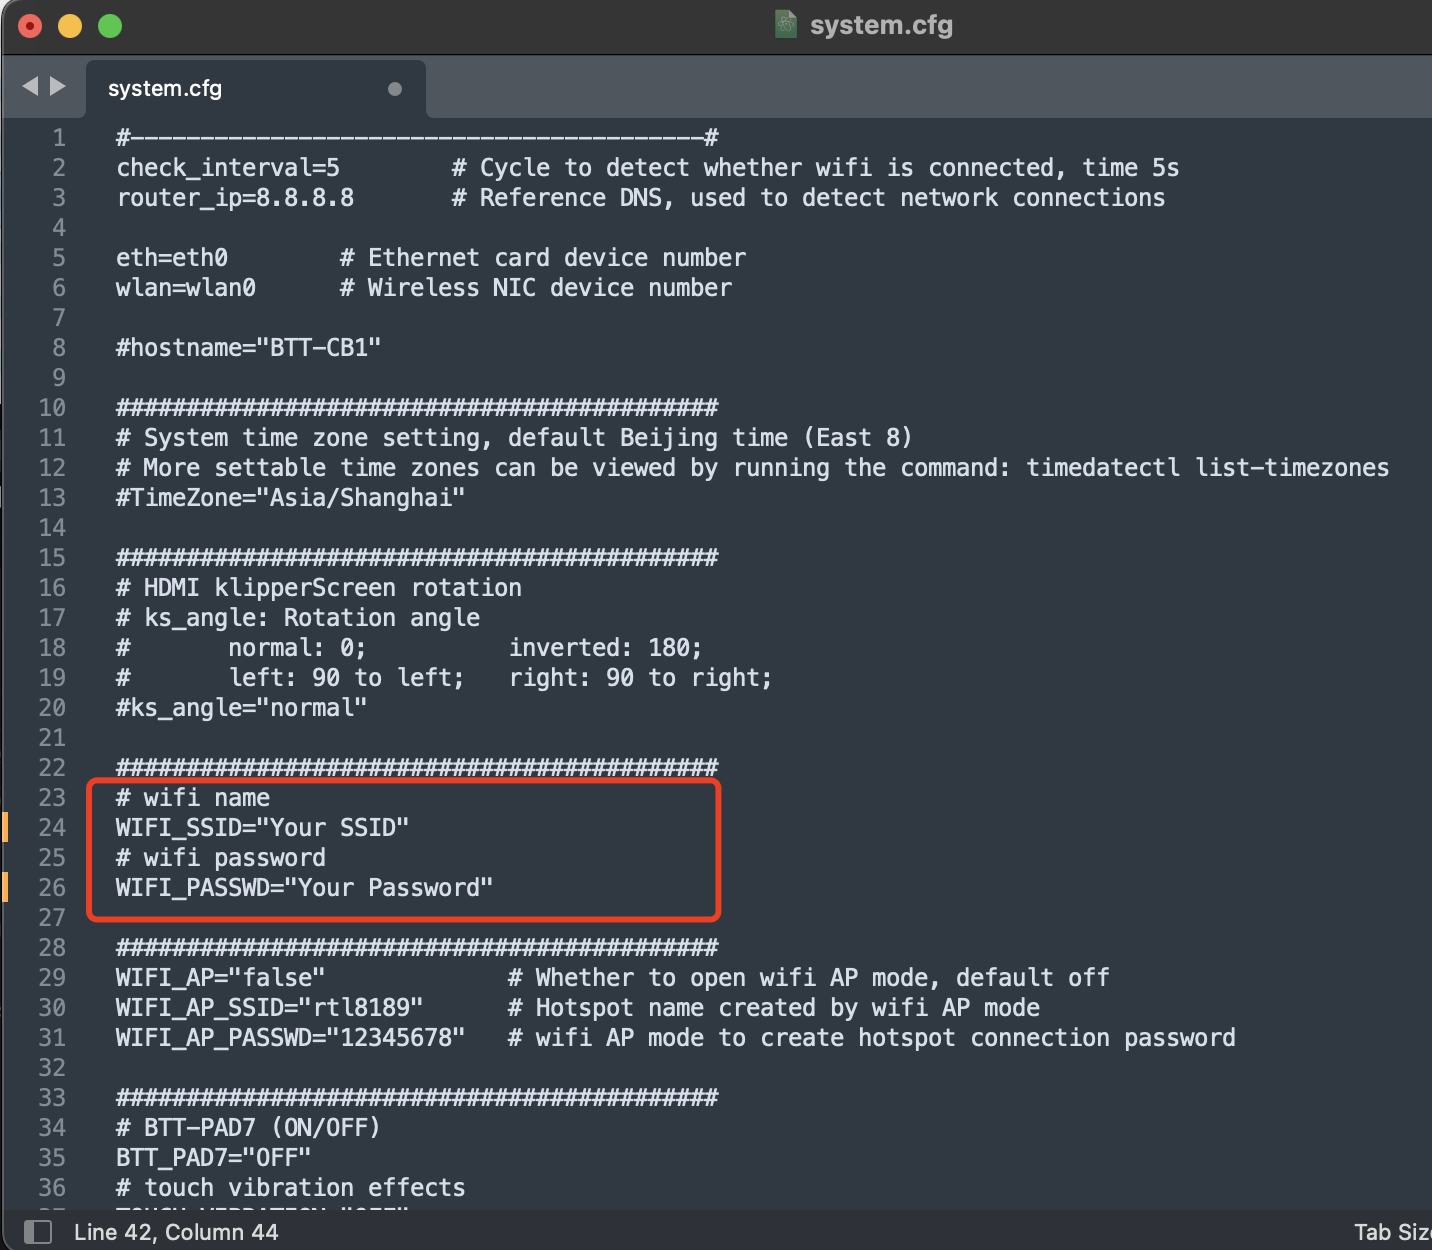
When the flash is done, replug the TF card in your PC. You should be able to access the BOOT partition on the card from your PC's file manager of choice.
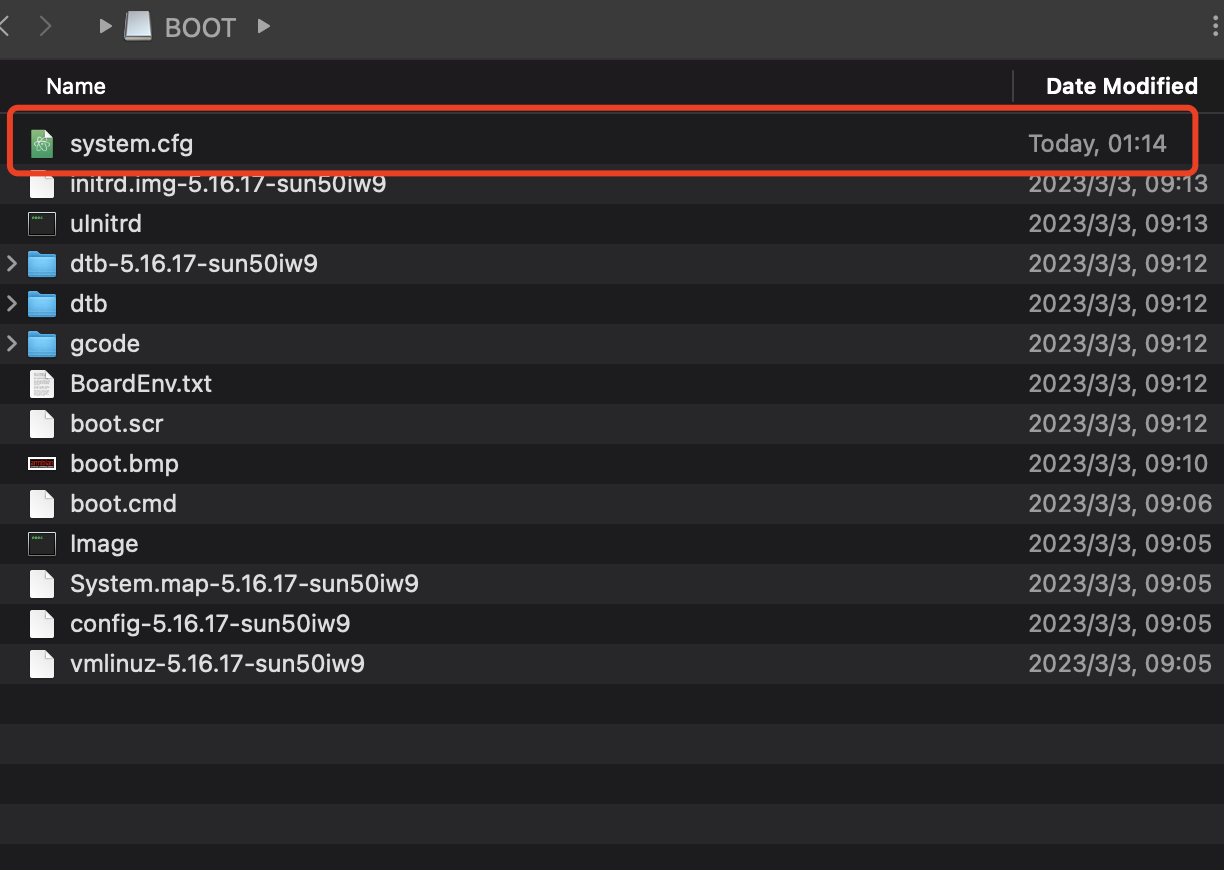
Edit system.cfg and change the WIFI setting to yours by replacing the values within the quotes (do not delete the quotes themselves).
That's all. Now just eject the card from the PC, install the card to the M8P, and install the CB1 to the M8P.
The TF card must install to the SOC-CARD, not the MCU-CARD slot.
It takes more force than you'd expect to install the CB1 on the M8P. You will feel it snap into place when properly inserted. Visually inspect the CB1 after mounting to ensure that the CB1 is flush against the Manta on all four corners.

Now power on and wait a few minutes, you should be able to see the CB1 IP address in your router.
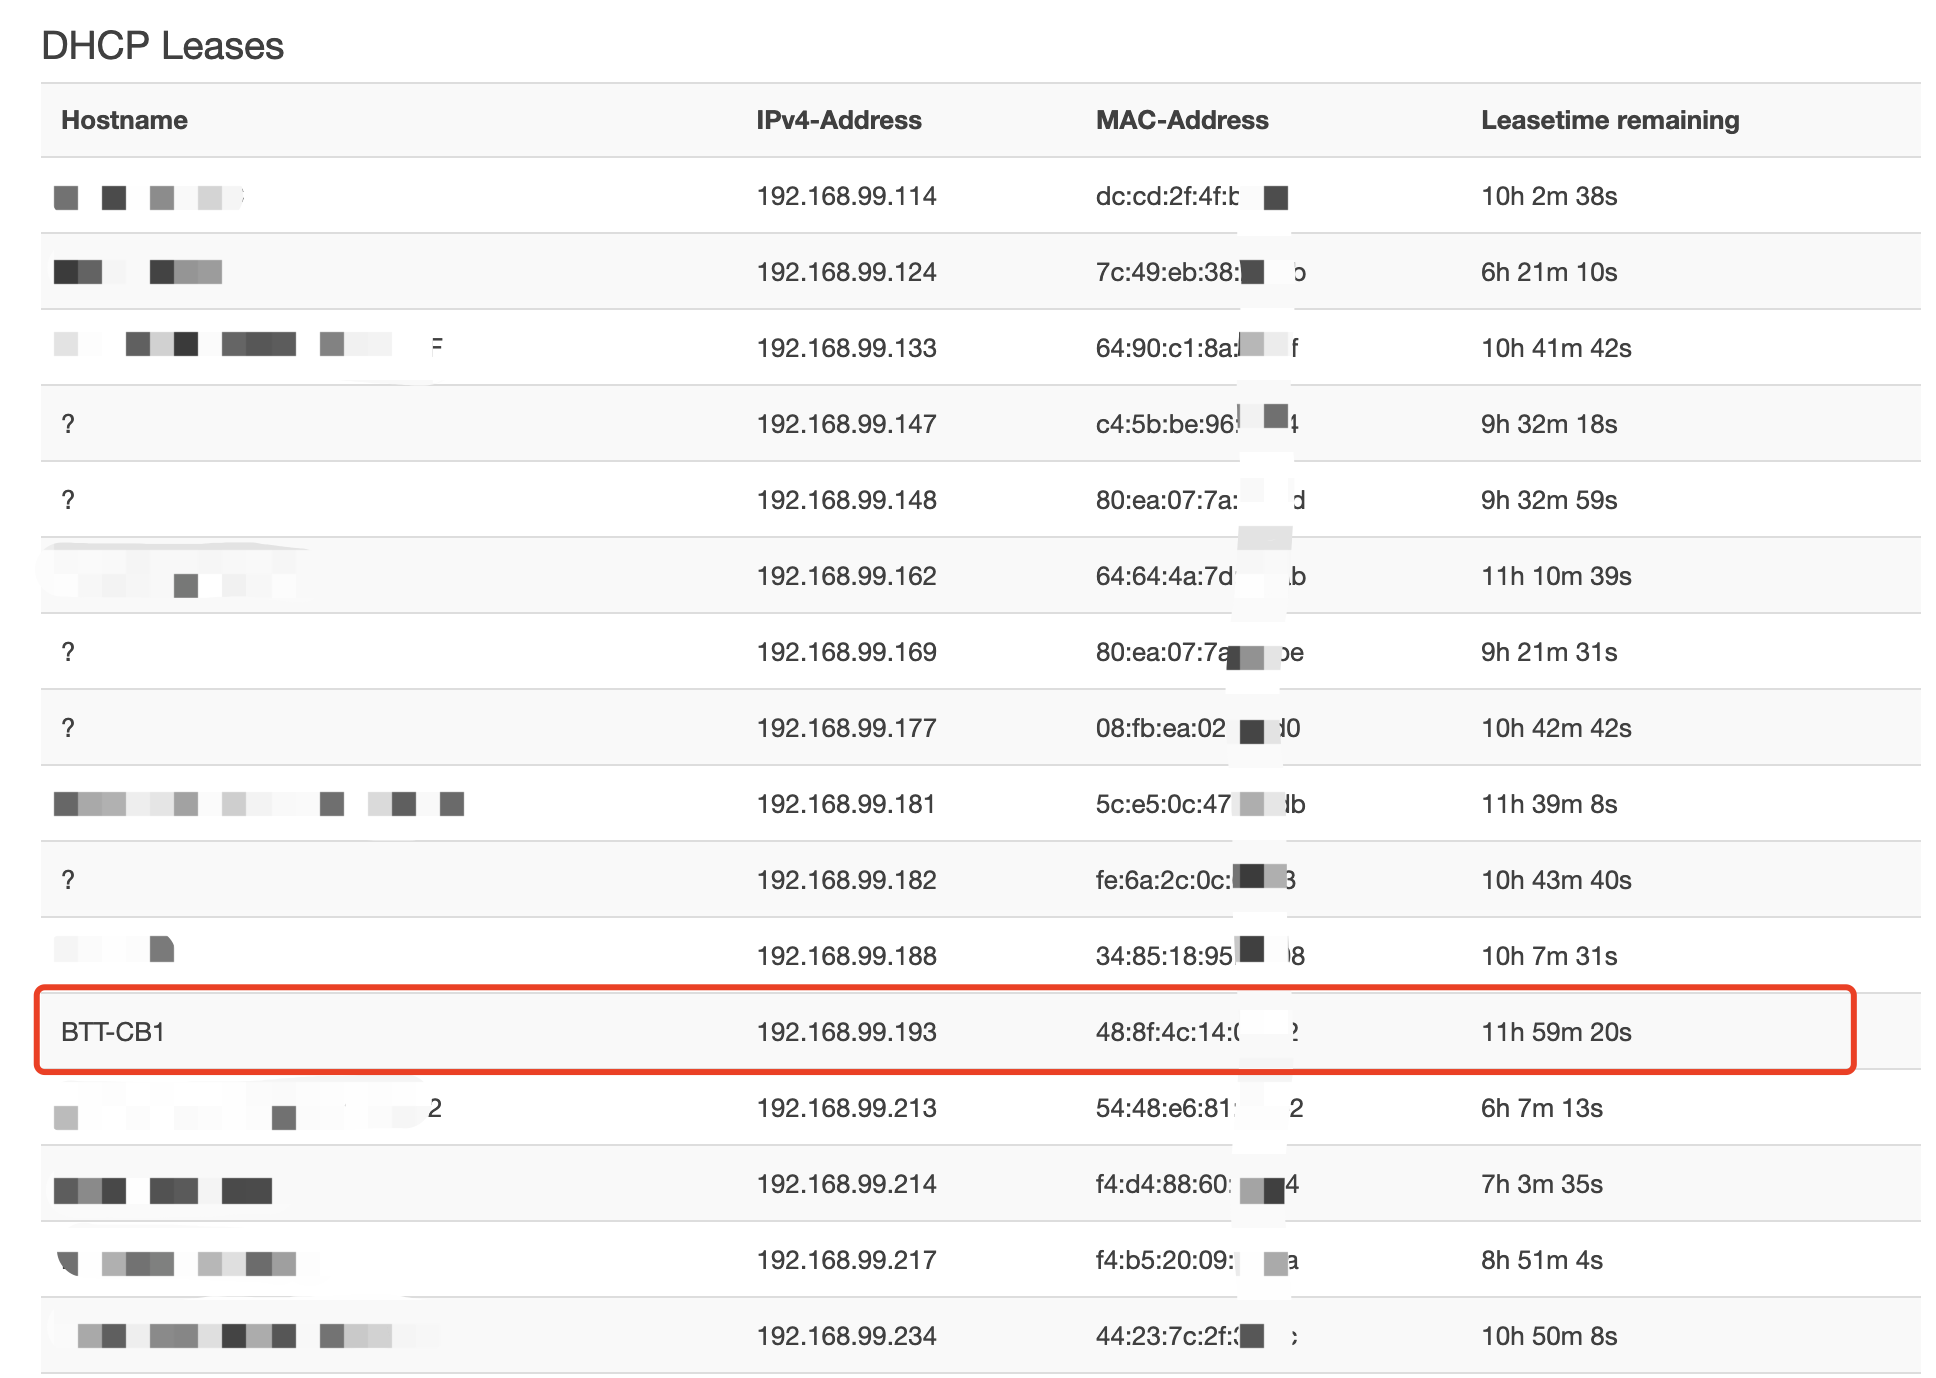
Use your browser to visit the IP address shown on your router. The Mainsail web interface should be displayed.
[Optional] Update
We recommend updating Klipper to the latest version before proceeding.
Set CB1 Can Bridge Bitrate
These instructions and many of those that follow are done on the CB1 itself. The CB1 is accessed via an SSH terminal interface. How you do this is up to you. You can use a program like Mobaxterm to give you a bit of a GUI interface, but most people choose to use the Command Prompt on Windows or a Terminal program on MacOS / Linux.
We use a $ symbol to show most of the single line commands you need to type into the command line (like the ssh command that follows). Commands that might generate a lot of output from the CB1 are preceded with something that looks like biqu@BTT-CB1:~, and will be followed by the expected output from the CB1 in various colors.
Use ssh to access the CB1 from your PC:
$ ssh [email protected]
[email protected]'s password:biqu  (<-- Password will not be echoed to screen)
You might get a warning the first time you ssh into the CB1. Acknowledge any prompt and proceed as we know this connection is a safe one.
If it wasn't clear from the above above, the CB1 is accessed with the username biqu and password biqu.
Next we need to make sure that the CB1 uses the proper Canbus data rate. This information is stored in a configuration file that we will edit with a simple editor called nano. The editor name is preceded by sudo, telling Linux that we want to run this as a superuser with unlimited powers and permissions.
$ sudo nano /etc/network/interfaces.d/can0Enter the password biqu if prompted. Change the bitrate value to 1000000 if necessary and any other values as required. The file should look exactly like this when you are done:
allow-hotplug can0
iface can0 can static
    bitrate 1000000
    up ifconfig $IFACE txqueuelen 1024
Save the file within the editor with Ctrl-O and then Enter to acknowledge.
Disable Unnecessary Services
By default, the BTT image for the CB1 runs several background services that are not properly configured by default and will repeatedly fail and restart every few seconds. One service called hostapd tries to turn your printer into a wireless hotspot. The other service called klipper-mcu allows use of the CB1 processor's GPIO and SPI ports as if it was a second MCU on top of the one already built into the Manta. Neither of these services is required for our purposes, and disabling them will ease the workload on the CB1 and minimize spam in your error logs.
Assuming you are still connected to your printer via ssh from the previous step, enter these two commands to disable the two services.
$ sudo systemctl disable hostapd
$ sudo systemctl disable klipper-mcu
Your command and the resulting output should look like this:
biqu@BTT-CB1:~$ sudo systemctl disable hostapd
Synchronizing state of hostapd.service with SysV service script with /lib/systemd/systemd-sysv-install.
Executing: /lib/systemd/systemd-sysv-install disable hostapd
Removed /etc/systemd/system/multi-user.target.wants/hostapd.service.
biqu@BTT-CB1:~$ sudo systemctl disable klipper-mcu
Removed /etc/systemd/system/multi-user.target.wants/klipper-mcu.service.
If you have no use for KlipperScreen (the software that supports the printer's touchscreen GUI), you can disable it now or in the future with:
$ sudo systemctl disable KlipperScreenReboot the CB1 from the command line for these changes and those in the previous section to take effect:
$ rebootFlash M8P
If you run into a problem flashing the M8P in this section or the EBB in the next sections, check out the Troubleshooting section at the bottom of this page for ideas.
$ cd ~/klipper
$ make menuconfig
Then set everything up as shown. Use the arrow keys to navigate and Enter to change selections. Enter will also take you into sub-menus indicated by --->
[*] Enable extra low-level configuration options
    Micro-controller Architecture (STMicroelectronics STM32)  --->
    Processor model (STM32H723)  --->
    Bootloader offset (128KiB bootloader)  --->
    Clock Reference (25 MHz crystal)  --->
    Communication interface (USB to CAN bus bridge (USB on PA11/PA12))  --->
    CAN bus interface (CAN bus (on PD0/PD1))  --->
    USB ids  --->
(1000000) CAN bus speed
()  GPIO pins to set at micro-controller startup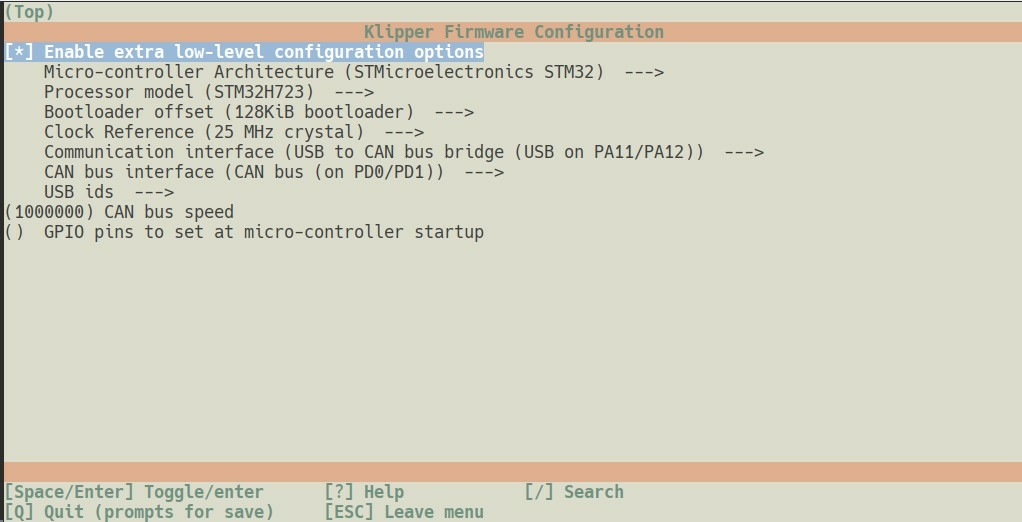
Press Q to save and then run make from the terminal.
$ makeIf you realize you've run "make" with incorrect settings, you can always go back and do make menuconfig, then make again.
This will create the Klipper firmware file out/klipper.bin for the Manta.
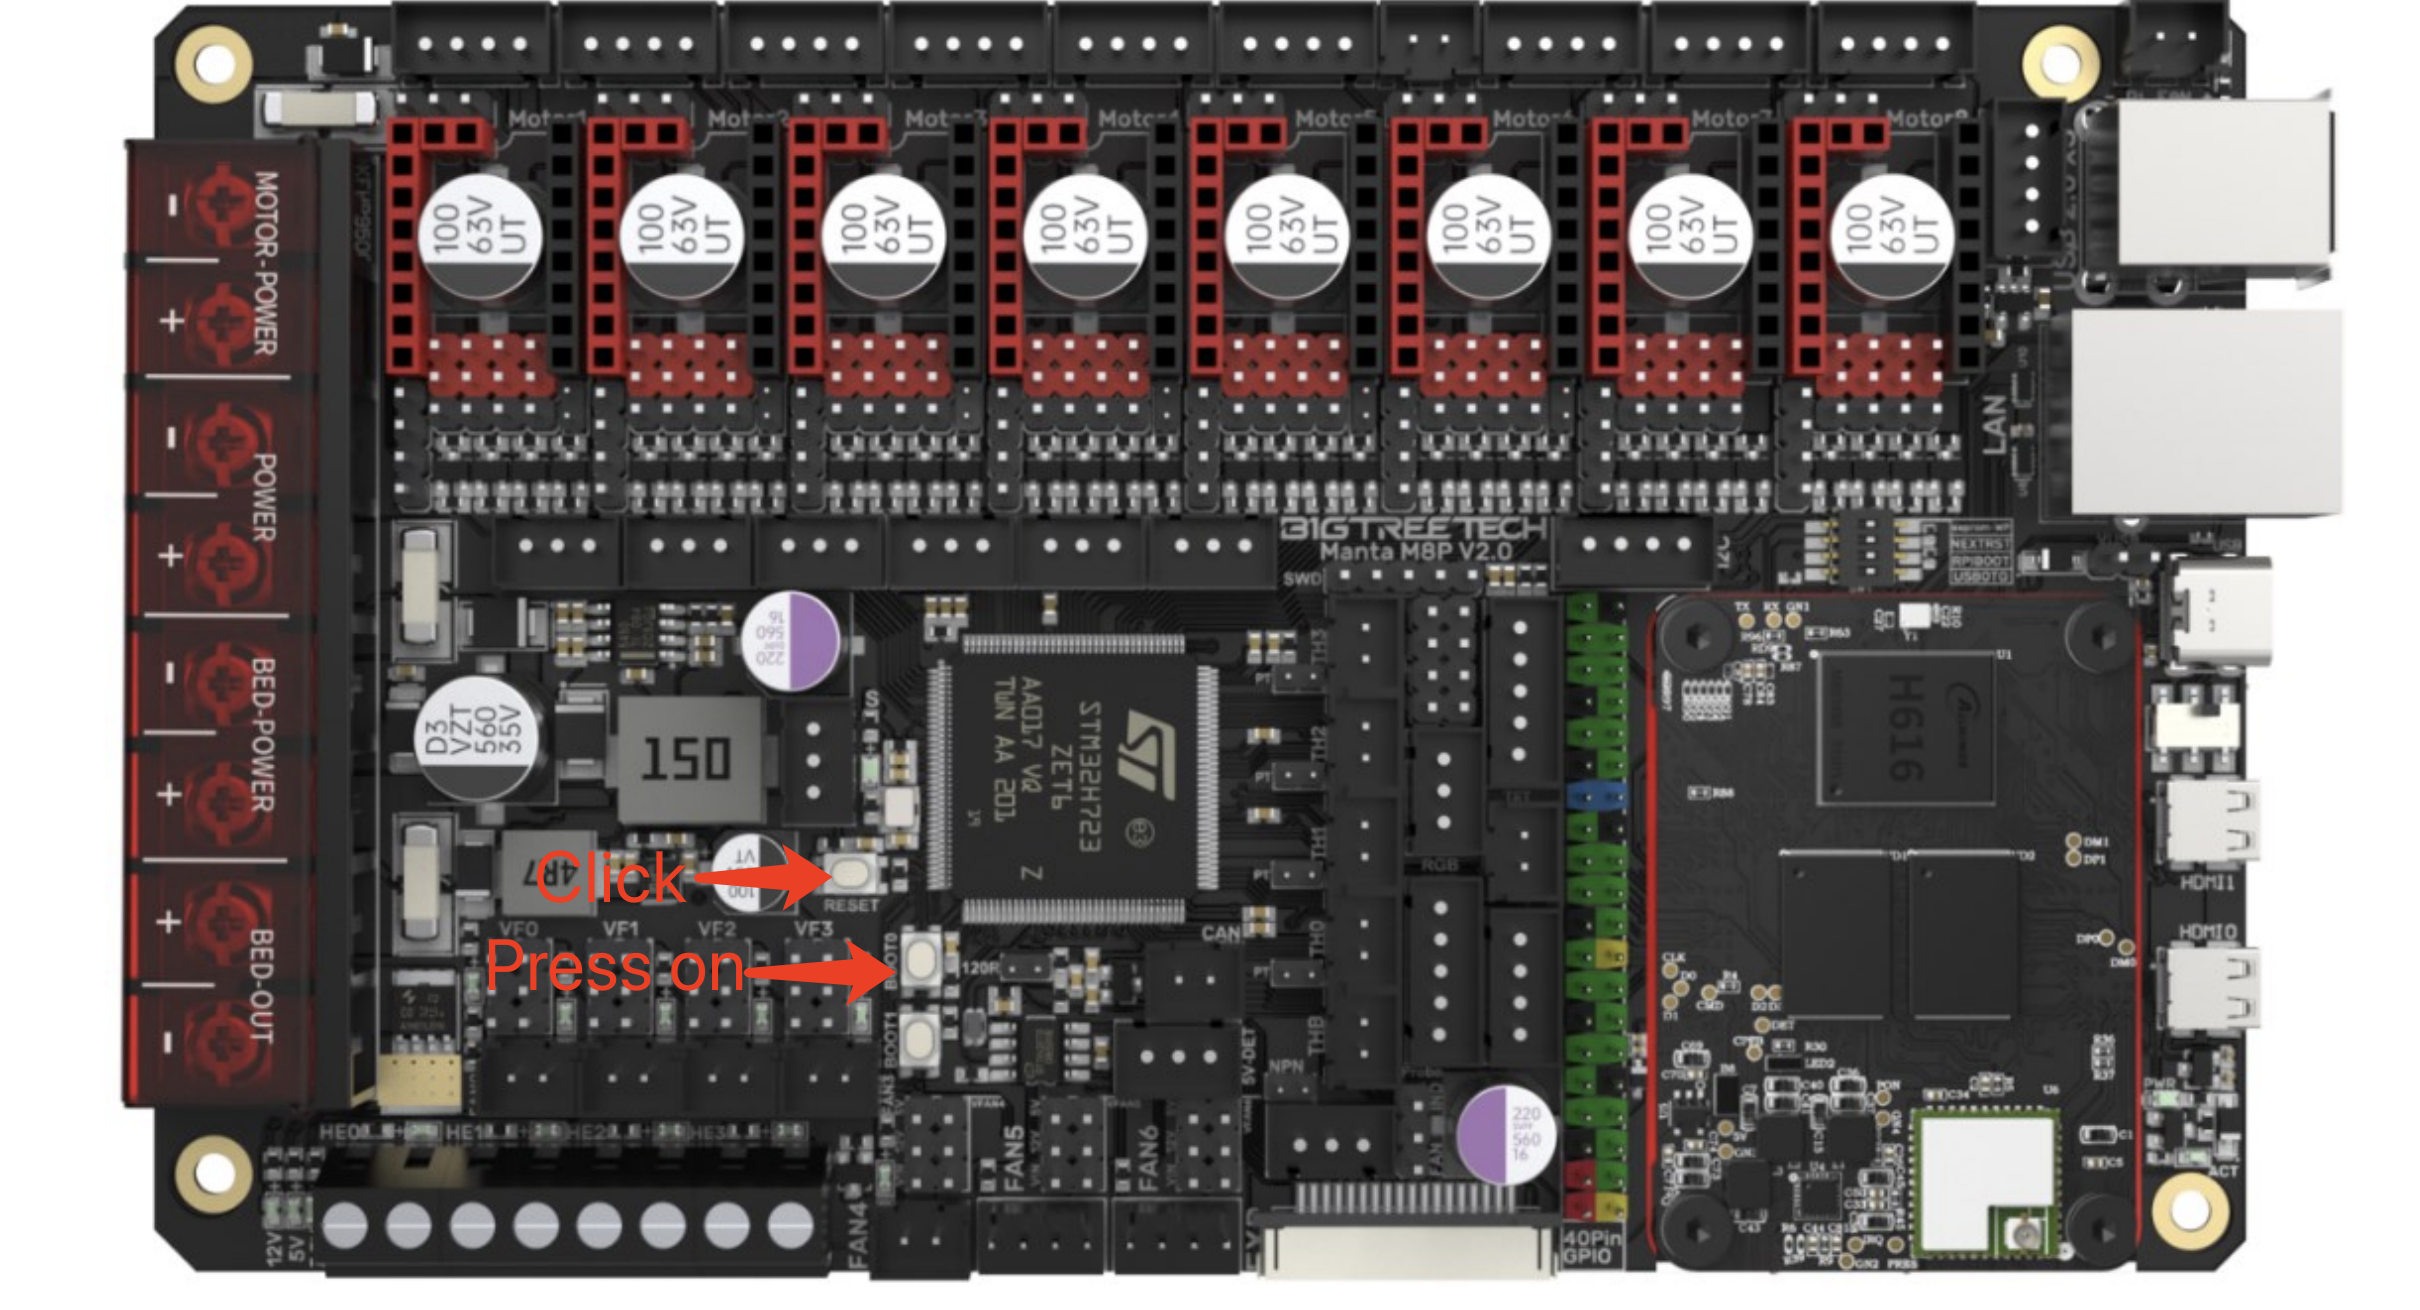
Next we will flash it to the Manta with DFU. To enter DFU mode, press on BOOT0 and click the RESET button (i.e. Press and hold BOOT0, press and release RESET, release BOOT0, all on the Manta).
Both the M8P here and the EBB later have the same USB ID when in DFU mode, so you should only ever put one of them in DFU mode at a time or you risk flashing the wrong device.
Let's verify that the Manta is in DFU mode:
$ lsusb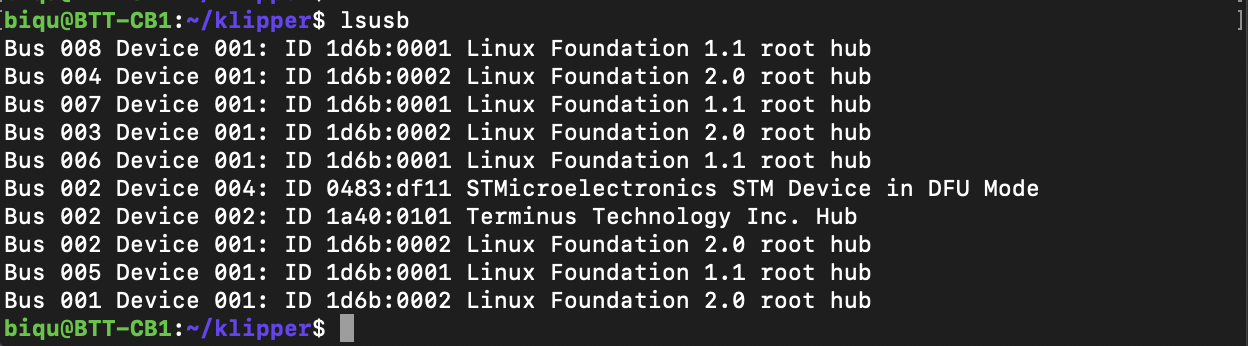
There should be a DFU Mode device found. Record its ID, but normally it's 0483:df11. Now flash it.
$ make flash FLASH_DEVICE=0483:df11Your command and the resulting output should look like this:
biqu@BTT-CB1:~/klipper$ make flash FLASH_DEVICE=0483:df11
  Flashing out/klipper.bin to 0483:df11
sudo dfu-util -d ,0483:df11 -R -a 0 -s 0x8020000:leave -D out/klipper.bin

dfu-util 0.9

Copyright 2005-2009 Weston Schmidt, Harald Welte and OpenMoko Inc.
Copyright 2010-2016 Tormod Volden and Stefan Schmidt
This program is Free Software and has ABSOLUTELY NO WARRANTY
Please report bugs to http://sourceforge.net/p/dfu-util/tickets/

dfu-util: Invalid DFU suffix signature
dfu-util: A valid DFU suffix will be required in a future dfu-util release!!!
Opening DFU capable USB device...
ID 0483:df11
Run-time device DFU version 011a
Claiming USB DFU Interface...
Setting Alternate Setting #0 ...
Determining device status: state = dfuIDLE, status = 0
dfuIDLE, continuing
DFU mode device DFU version 011a
Device returned transfer size 1024
DfuSe interface name: "Internal Flash   "
Downloading to address = 0x08020000, size = 31336
Download	[=========================] 100%        31336 bytes
Download done.
File downloaded successfully
dfu-util: Error during download get_status

Failed to flash to 0483:df11: Error running dfu-util

If the device is already in bootloader mode it can be flashed with the
following command:
  make flash FLASH_DEVICE=0483:df11
  OR
  make flash FLASH_DEVICE=1209:beba

If attempting to flash via 3.3V serial, then use:
  make serialflash FLASH_DEVICE=0483:df11

make: *** [src/stm32/Makefile:100: flash] Error 255
If it shows like this, then you have flashed it successfully,
Now click the RST button on the Manta to restart the M8P (it won't restart CB1).
Check M8P Can uuid:
$ python3 lib/canboot/flash_can.py -qYour command and the resulting output should look like this:
biqu@BTT-CB1:~/klipper$ python3 lib/canboot/flash_can.py -q
Resetting all bootloader node IDs...
Checking for canboot nodes...
Detected UUID: 4b94c57be78e, Application: Klipper
Query Complete
Record your M8P can uuid. It is 4b94c57be78e in this example. Yours should be different.
Flash Canboot to EBB by USB
If you didn't do it at the start of this process, plug the USB-5V and 120R jumpers on the EBB and connect it to the M8P via a USB-A to USB-C data cable like that provided with the Manta.
As noted in the introduction, we need to flash Canboot to the EBB before we flash Klipper to it.
$ cd ~
$ git clone https://github.com/Arksine/CanBoot
$ cd CanBoot
$ make menuconfig
Canboot was recently renamed to Katapult. Read one as the other and you'll be fine.
(Top)
                        CanBoot Configuration v0.0.1-41-gffd8ac6
    Micro-controller Architecture (STMicroelectronics STM32)  --->
    Processor model (STM32G0B1)  --->
    Build CanBoot deployment application (Do not build)  --->
    Clock Reference (8 MHz crystal)  --->
    Communication interface (CAN bus (on PB0/PB1))  --->
    Application start offset (8KiB offset)  --->
(1000000) CAN bus speed
()  GPIO pins to set on bootloader entry
[*] Support bootloader entry on rapid double click of reset button
[ ] Enable bootloader entry on button (or gpio) state
[*] Enable Status LED
(PA13)  Status LED GPIO Pin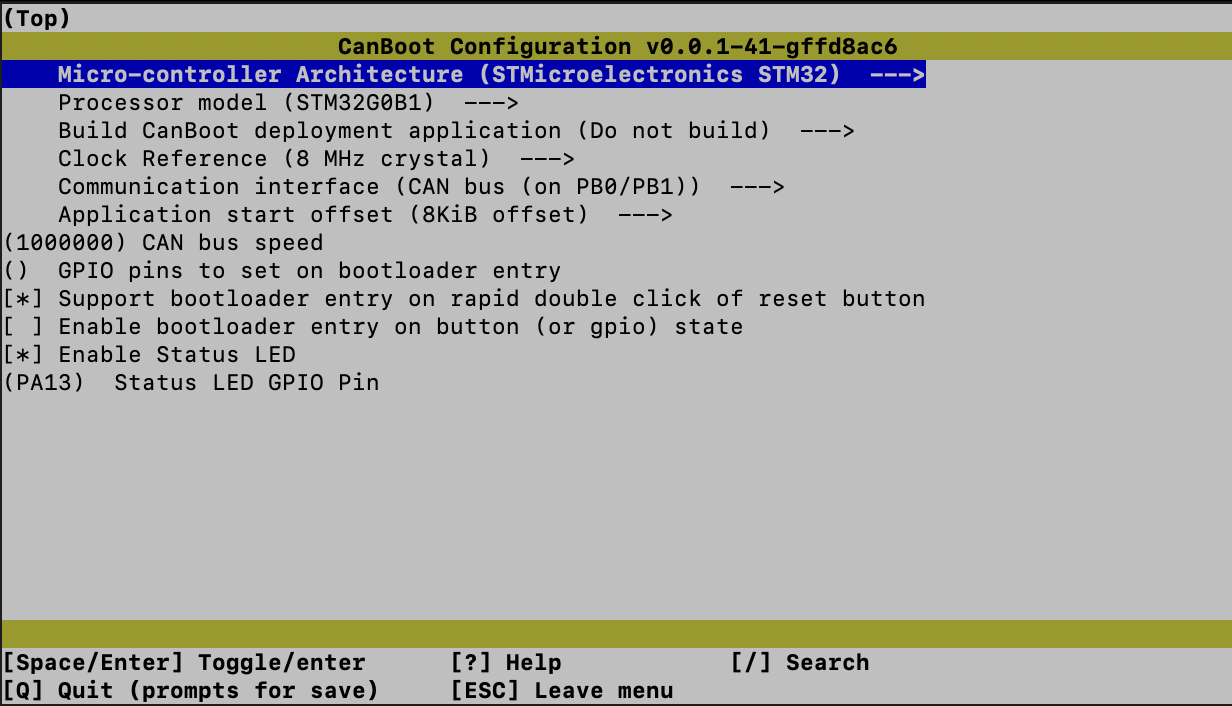
Press Q to save and then run make from the terminal.
$ makeHold down the BOOT button and click RST on the EBB SB to put the EBB into DFU mode. Let's check if it worked:
$ lsusb
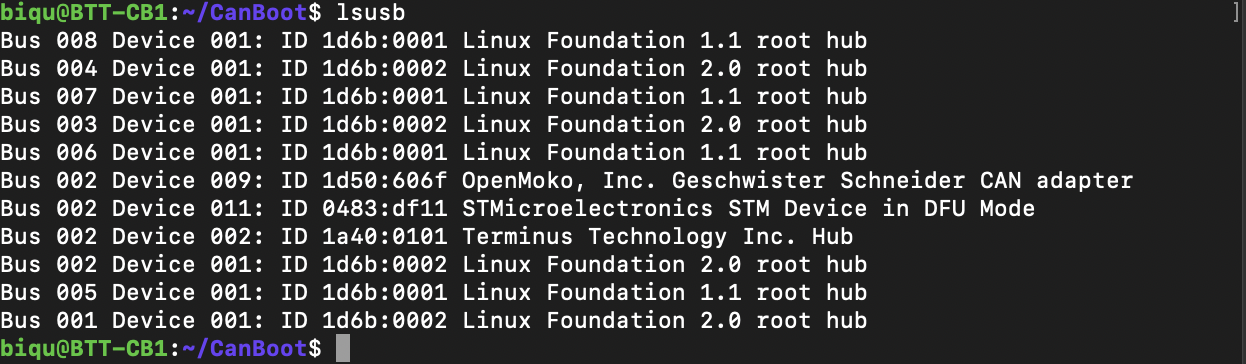
There should be another DFU device 0483:df11
Now we can flash Canboot to the EBB.
$ dfu-util -a 0 -d 0483:df11 --dfuse-address 0x08000000 -D ~/CanBoot/out/canboot.binYour command and the resulting output should look like this:
biqu@BTT-CB1:~/CanBoot$ dfu-util -a 0 -d 0483:df11 --dfuse-address 0x08000000 -D ~/CanBoot/out/canboot.bin
dfu-util 0.9

Copyright 2005-2009 Weston Schmidt, Harald Welte and OpenMoko Inc.
Copyright 2010-2016 Tormod Volden and Stefan Schmidt
This program is Free Software and has ABSOLUTELY NO WARRANTY
Please report bugs to http://sourceforge.net/p/dfu-util/tickets/

dfu-util: Invalid DFU suffix signature
dfu-util: A valid DFU suffix will be required in a future dfu-util release!!!
Opening DFU capable USB device...
ID 0483:df11
Run-time device DFU version 011a
Claiming USB DFU Interface...
Setting Alternate Setting #0 ...
Determining device status: state = dfuIDLE, status = 0
dfuIDLE, continuing
DFU mode device DFU version 011a
Device returned transfer size 1024
DfuSe interface name: "Internal Flash   "
Downloading to address = 0x08000000, size = 4468
Download	[=========================] 100%         4468 bytes
Download done.
File downloaded successfully
Flash Klipper to EBB by USB
Remember in the Introduction we said we were going to flash Klipper to both the Manta and the EBB? We already did the Manta so now it is the EBB's turn.
$ cd ~/klipper
$ make menuconfig
(Top)
Klipper Firmware Configuration
[*] Enable extra low-level configuration options
Micro-controller Architecture (STMicroelectronics STM32) --->
Processor model (STM32G0B1) --->
Bootloader offset (8KiB bootloader) --->
Clock Reference (8 MHz crystal) --->
Communication interface (CAN bus (on PB0/PB1)) --->
(1000000) CAN bus speed
() GPIO pins to set at micro-controller startup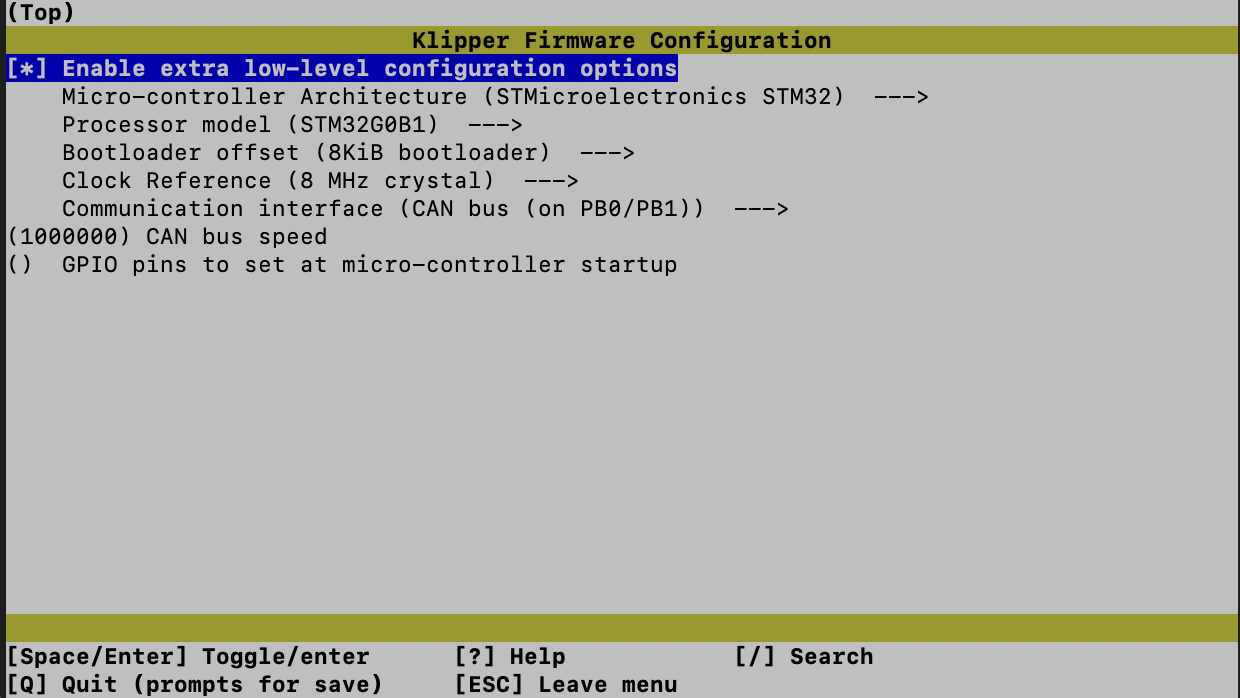
Press Q to save and then run make from the terminal:
$ makeSet EBB SB2209 to DFU mode by holding BOOT and clicking RST to enter DFU mode. Then run lsusb
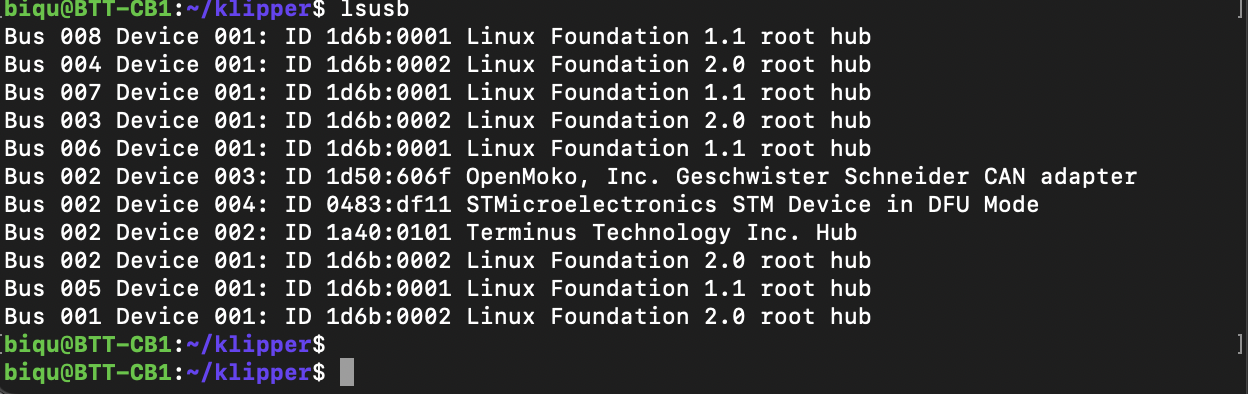
Flash it
$ dfu-util -a 0 -d 0483:df11 --dfuse-address 0x08002000 -D out/klipper.binNote how the address is 0x08002000 here vs the 0x08000000 when canboot was flashed. This prevents the first flash on the toolhead from being overwritten by the second
Flash Checks
The python-based checks don't always work right, and some people have more luck than others getting them to work. Powering everything down and back up might increase your chances of getting them working. Generally speaking, if the flash commands complete successfully and the output looked as expected, it should be OK.
- Canboot Check
Double click the RST button on the EBB. The red LED should blink.
$ cd ~/klipper
$ python3 lib/canboot/flash_can.py -q
If it shows like this, then Canboot has flashed successfully.
biqu@BTT-CB1:~/klipper$ python3 lib/canboot/flash_can.py -q
Resetting all bootloader node IDs...
Checking for canboot nodes...
Detected UUID: 4b94c57be78e, Application: Klipper
Detected UUID: 2f0b1ce14660, Application: CanBoot
Query Complete- Klipper Check
Click the RST Button on the EBB. The LED shouldn't blink anymore.
$ python3 lib/canboot/flash_can.py -qIf it shows like this, Klipper has flashed successfully.
biqu@BTT-CB1:~/klipper$ python3 lib/canboot/flash_can.py -q
Resetting all bootloader node IDs...
Checking for canboot nodes...
Detected UUID: 4b94c57be78e, Application: Klipper
Detected UUID: 2f0b1ce14660, Application: Klipper
Query Complete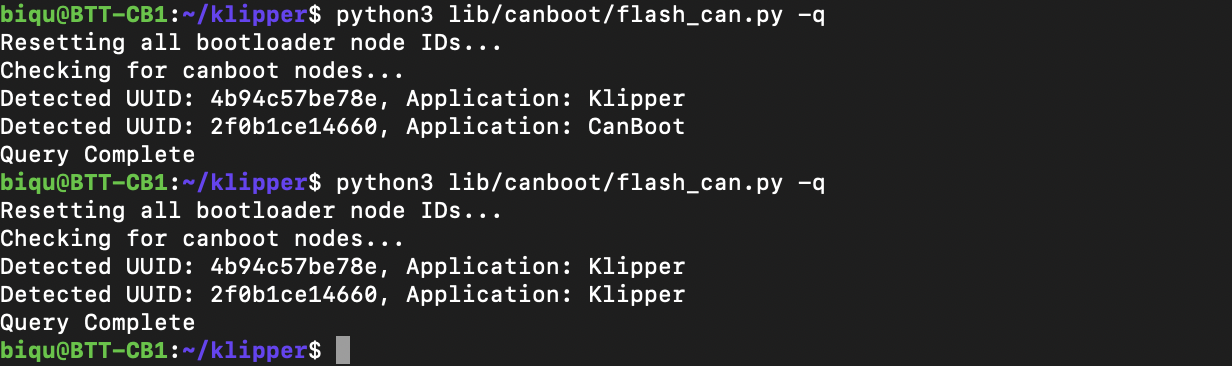
All flash work is done. Now 4b94c57be78e is your M8P uuid, and 2f0b1ce14660 is your toolboard uuid.
Use these to replace the placeholder uuid values inprinter.cfg. You can use the text editor built into the Mainsail web interface to easily make these changes. This annotated screenshot points out the key parts of the interface you'll need to know about for this.
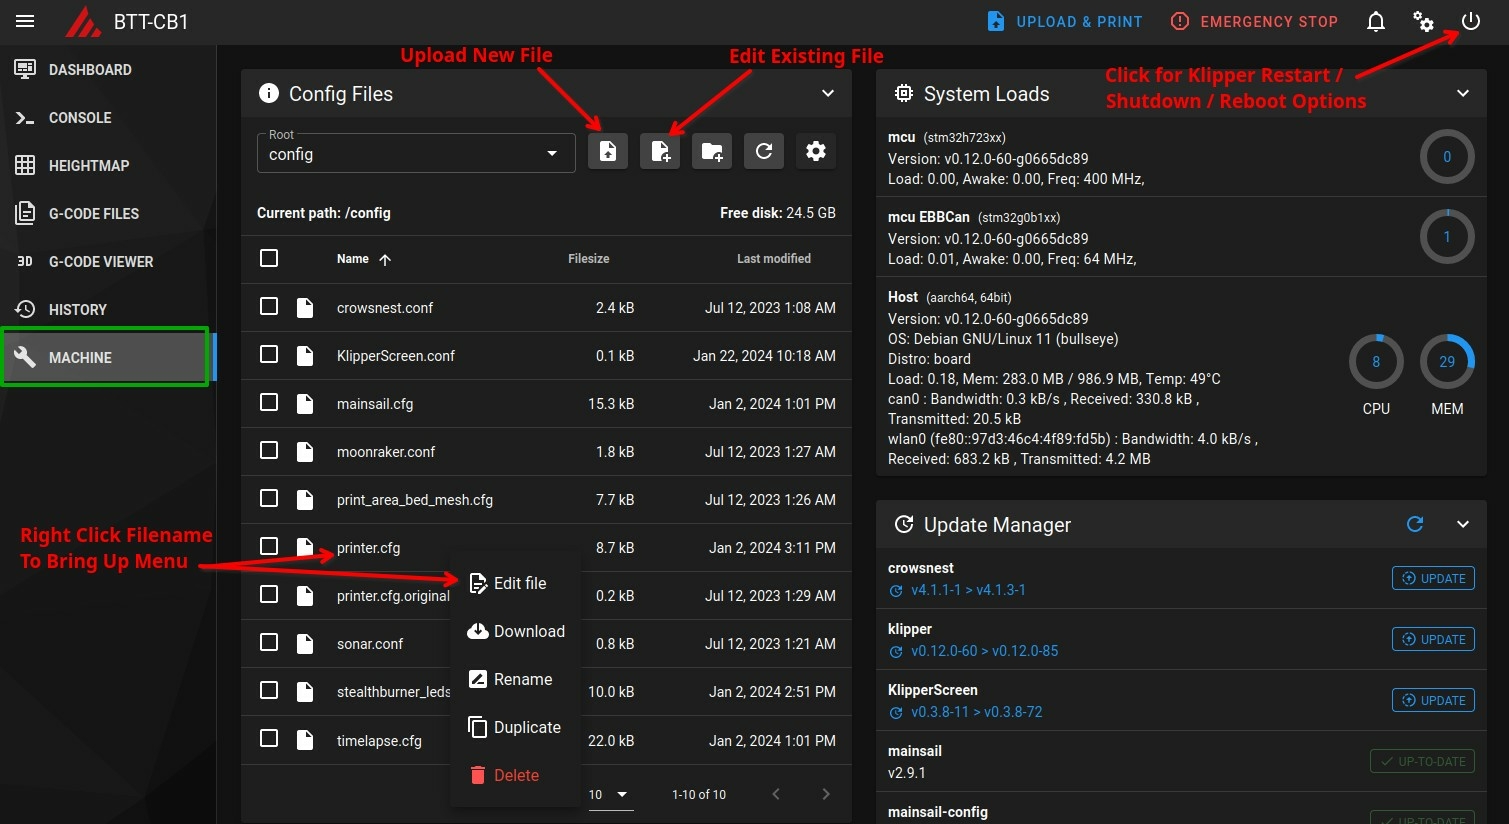
You should end up with something that looks like this in your printer.cfg file, replacing the canbus_uuid values for the Manta MCU and the EBB with your values. When your edits are done, select "SAVE & RESTART" from the top right corner of the editor.
#####################################################################
#   UUID Setting
#####################################################################
[mcu]
canbus_uuid:4b94c57be78e

[mcu EBBCan]
canbus_uuid: 2f0b1ce14660
Finally, remove the v_usb jumper on the M8P and usb_5v jumper on the EBB SB. Keep the 120R jumper on both the M8P and the EBB.
Troubleshooting
Problem: I can't see the EBB Toolhead using lsusb after flashing the Manta but its Power LED is on.
- Verify that you are using a USB data cable and not a charging cable
- Make sure the USB-C cable is plugged firmly into the EBB. It will click into place when properly connected.
Problem: I flashed the Manta board and I see an entry for it with lsusb after doing so, but it disappears from lsusb after I reboot or cycle power.
- The Manta bootloader has probably been corrupted, possibly by flashing the EBB Canboot image to the Manta instead of the EBB by mistake. Follow these instructions on the BTT Github (opens in a new tab) to restore the bootloader on the Manta.
Problem: I am trying to flash the Manta / EBB but the system is not stable. The Canbus connection disconnects and reconnects, interfaces disappear and reappear, etc.
- You might have a weak USB power supply. We have seen instances where a marginal supply will cause the Manta to drop in and out while the CB1 operates normally. Or the CB1 and Manta might operate OK but the setup becomes unstable when the SB2209 is connected. Switch to a power supply / USB port that can provide more current and see if the problem goes away.
Problem: I am using a Raspberry Pi CM4 instead of the BigTreeTech CB1 and username: biqu, password: biqu does not work for me.
- See the BTT manual. For this board it should be
username: pi,password: raspberry